In-Lab Project #0: Setting up Eclipse
To be done, optionally, on Wed, March 30 during your scheduled lab section
This assignment is to be done individually
Introduction
This lab assignment is intended to allow you to familiarize yourself with Eclipse, which we'll be using for our work in Java this quarter. It takes you through the process of setting it up for use in this course, creating a project and importing code into it (which you'll need to do for each subsequent programming project), then using it to edit and run a Java program.
Some of our work this quarter will be done in pairs, but I'd like each of you to go through this assignment individually, so that everyone in the class will be ready to use Eclipse as we do our work this quarter.
(A few of you may have used Eclipse before, and that's fine, but I'd still like you to spend some time at least reading through this assignment. Eclipse has been set up here in particular way, the same way that your TA will use it to grade your work. Please go through the steps as they're described here, even if you know a different way to do things, and even if you're convinced that your way is better. One of the hallmarks of Eclipse is that it often provides several ways to accomplish the same task, but I'd like everyone to be familiar with one particular way of doing things, so that each of you is on common ground with your partners on subsequent projects. Time spent negotiating about how best to use Eclipse is time that could more profitably be spent on design and coding.)
What is Eclipse?
Eclipse is an integrated development environment (IDE), which combines a text editor, a compiler, a virtual machine, and a number of additional tools into one application. Eclipse was not designed for educational purposes; it's an industrial-strength tool that is much more complex and full-featured than we'll need in this course. However, it has many benefits in an educational context, such as these:
- It automatically compiles your program every time you save one of your files, giving you immediate feedback (errors and warnings) that will prevent you from wandering too far in the wrong direction.
- It includes a visual debugger, which can be a handy aid when trying to find and fix bugs in your programs.
- It includes built-in support for a well-known Java testing framework called JUnit that we'll learn more about later this quarter.
- It introduces you to a tool that is used on an everyday basis in the industry, which you can continue to learn about as you progress through your education and beyond.
When using a large, complex tool for the first time, the tricky part is not allowing yourself to become lost in all of the details and options that it presents to you. It turns out that you don't have to know very much about Eclipse to use it effectively in this course; this lab assignment is intended to equip you with most of the knowledge you'll need for the duration of the quarter. Once in a while, a new Eclipse skill will be required; when one is needed, I'll introduce the steps.
The following is a more-or-less-accurate screenshot of Eclipse in action:
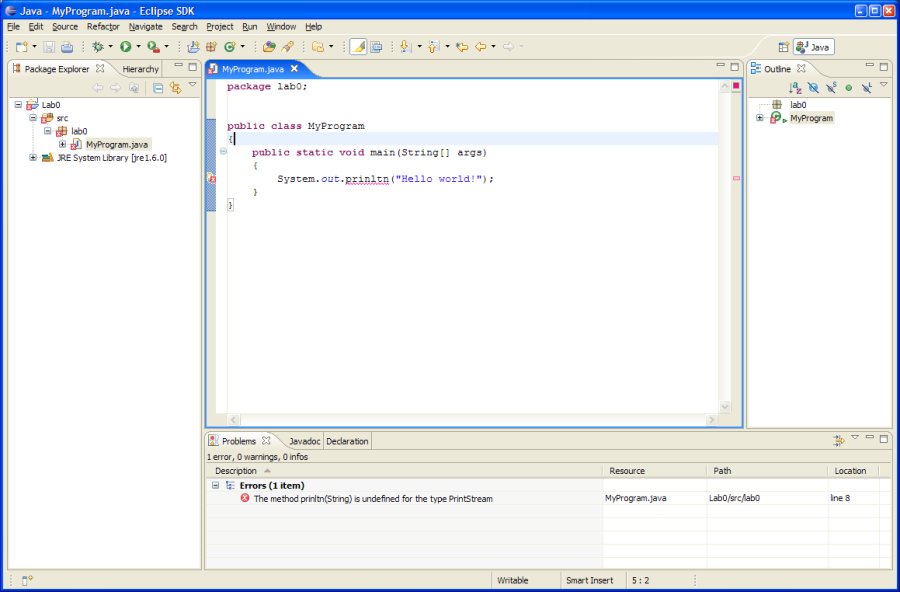
The window is separated into a few major areas that you'll find useful:
- The editor is the dominant portion of the window in the center. This is the part of the window where you'll edit your programs.
- The lower portion of the window includes the "Problems" tab, which gives you a list of the errors and warnings that the compiler found in your program the last time you saved it. This is a handy way to keep track of what issues need to be addressed; generally, it's best to address them as soon as you can. In the example above, I've misspelled "println," which has resulted in an error. After fixing the problem and resaving the program, the error message will disappear automatically. If you religiously address issues like these as soon as you can, most of your typos won't last more than a few seconds.
- Along the left-hand side of the window is the "Package Explorer," which gives you easy access to all of the files that make up your projects. Double-clicking the name of a file brings it up in the editor. You can also easily see which files have errors or warnings associated with them. In the screenshot above, notice that "MyProgram.java" has a red "x" next to its name; this means that it contains at least one error.
Workspaces
The purpose of a workspace
One of the helpful features of Eclipse is how it helps you to organize your work, on one project or many, easily. It also gives you the ability to tweak a wide variety of settings, such as the version of Java to use to compile your programs, the fonts and colors displayed in the editor, the style of the code that Eclipse generates for you, and so on. A workspace is the repository for all of the files that make up your projects and all of your settings.
A workspace is stored on your hard drive within a single folder. When you start Eclipse, you select the workspace (the folder) that you'd like to use. I suggest using a single workspace for all of your work this quarter, as it will give you easy access to all of your previous work, as well as maintain your settings from one project to the next.
Downloading and installing our workspace for this course
Eclipse provides a large set of options that allow you to configure it. When you're using it for the first time, though, it's hard to know which options to change and what you should change them to. Unfortunately, the default settings aren't entirely appropriate for us in this course. Additionally, personal preferences tend to differ, which can sometimes make it difficult for a pair to work together productively.
To keep things straightforward for us this quarter, we'll all use the same initial workspace. I've created an empty workspace, with settings appropriate for your use this quarter; these settings will match the settings used by your TA when grading your work. The "official" workspace for our course is available at the link below.
The workspace is provided in zip format; to use it, unzip it to a folder in a place you'll be able to find again. A good place to put it when working in the ICS labs is on your H: drive, so that it will be available to you regardless of which machine you're logged into. For example, you might put your workspace into a folder named H:\22Workspace. You might instead want to store it on a USB memory stick or other portable media, but you should be sure to keep a backup in case you lose the original.
(Note to Mac users who intend to use Eclipse on their own machines: the zip archive may appear empty, because its only contents are a folder called .metadata. Files and folders whose names begin with a "." character are hidden in Mac OS X by default. Go ahead and unzip the archive anyway.)
Starting Eclipse
To run Eclipse in the ICS labs, go to the Start menu, then find and click the shortcut titled Eclipse. When you first start Eclipse, it will ask you what workspace you want to use. Rather than accepting the default, type the complete path to the folder containing the workspace you downloaded and set up in the previous section (e.g., H:\22Workspace). This will cause Eclipse to start with your workspace loaded, already configured and ready for you to work.
(It's possible that you will not have been given a chance to specify what workspace you want; it will sometimes be the case that Eclipse has been previously configured on the lab machine by another student so that it won't ask. If you're not asked, but Eclipse instead starts up, go to the File menu and select Switch Workspace... and then Other..., then choose your workspace.)
Creating a new project
When you first start Eclipse in your new workspace, you'll find that there is nothing listed in "Package Explorer." Eclipse organizes your files into projects, with each project representing one program. In order to proceed with this assignment (and subsequent programming assignments), you'll need to first create a new project within your workspace, which will contain all of the .java files (and sometimes other files) that make up your program.
To create a new project, go to the File menu, select New, then Java Project. You'll now be presented with a dialog that asks you to name your project, and also make some other choices.
- In the text field marked "Project name", type Lab0.
- In the box titled "Contents," make sure that "Create new project in workspace" is selected.
- In the box titled "JRE," make sure that "Use default JRE" is selected.
- In the box titled "Project layout," make sure that "Create separate source and output folders" is selected.
Once you've made these selections, click Finish.
You should see a folder called Lab0 listed in the "Package Explorer." This folder represents your new project.
Importing Java code into a project
To give you a program to work with, I've written a short program that plays the "guess a number" game, where the computer chooses a number at random, then asks the user to guess what it is, providing hints along the way. The program is contained within the following three files:
To begin with, save these three files somewhere on your machine's hard drive, but not within your Eclipse workspace.
The next step is to import the code into the Lab0 project in your workspace. This turns out to be relatively simple to do. Remember that, when you started Eclipse, you selected the folder that contains your workspace (e.g., H:\22Workspace). A workspace is entirely self-contained within that folder, including all of your settings, preferences, as well as all of the files in each project within the workspace. Go to your computer's Start menu and choose Run.... In the ensuing dialog, type the complete path to your workspace folder (e.g., H:\22Workspace) and click OK. This will open your workspace folder so that you can explore it.
Notice that, within your workspace folder, there is a folder called Lab0. This corresponds to the Lab0 project that you created earlier. (There is also a folder called .metadata, which contains all of your preferences and settings.) Within the Lab0 folder, you'll find a folder called src. The src folder is intended to contain your .java files. (There is also a bin folder, which is intended to contain the compiled versions of your .java files, called .class files.)
Find the three .java files that you downloaded and drag them into the src folder inside of the Lab0 folder within your workspace. Then, in Eclipse, go to the Package Explorer area, right-click on the Lab0 project, and select "Refresh" from the menu. Voila! The three .java files are now part of your project!
Running a Java program from within Eclipse
Launching a program
Recall that a Java program is executed by specifying its "main class," the class that contains a special method called main with this signature:
public static void main(String[] args)
In the case of this program, the main class is GuessNumberUserInterface. To execute the program, then, we can right-click GuessNumberUserInterface.java in the Package Explorer, then select Run As..., then Java Application.
Where is the console?
This program performs all of its input and output via the console. When you compile and run a program from the command line, the command prompt window also acts as the program's console. But when you run a program from within Eclipse, it's not directly obvious where the console should be.
Look at the area of the Eclipse window where the "Problems" (error messages, warnings) are listed. There are other "tabs" available in the same area as the Problems tab. One of them is titled "Console". Click it. There's your console! Input and output can be handled within that window, in the same way that it was handled in the command prompt window in your previous coursework.
The "Console" tab gives you a valuable clue about whether a program is still running or has completed. For example, consider the following screenshot:
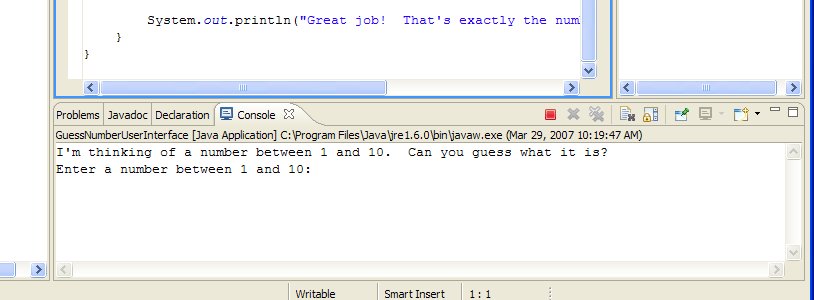
Notice the red, square-shaped button that's lit up; this button can be used to stop a running program. It can also tell you whether a program is still running, because it will only be active if the program is still in progress. When a program has stopped, you'll find that the square-shaped "stop" button is no longer active, as in the screenshot below:
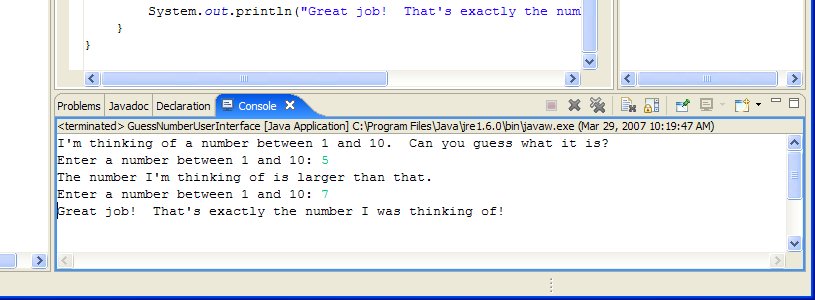
It's generally a good idea to dismiss the console output window when you're done with it by clicking the dark gray "X" button next to the "stop" button within the console area. (Don't click the "X" button next to the word "Console," though; that'll get rid of the Console tab from your user interface.) If there is more than one console output window within that area, you can click the button with two X's instead to dismiss all of them. (If you don't dismiss consoles when you're done with them, you'll find sometimes that multiple old versions of your program will still be running, which can be confusing.)
Editing the program
Make the following simple changes to the provided "guess a number" program.
- Change the game so that it chooses numbers within the range 1..100, rather than 1..10.
- Limit the user to five guesses before reporting that they have lost the game. (Note that there are a couple of ways to attack this: count the guesses within the user interface or count the guesses within the "engine." Before approaching this, consider which approach you think makes more sense and why. Introduce yourself to the person sitting next to you and discuss this issue with him or her.)
As you make each change, re-run your program and test it. Pay careful attention to the input and output. There is a subtle bug in the program that will only reveal itself after you make one of the appropriate changes.
Fix the bug and try your program again. See if you can find other problems with it.
Congratulations!
You're ready to proceed with your work in this course using Eclipse!