Testing Classes with JUnit
Lab


Introduction In this lab, you will examine a JUnit test for my two library classes that implement the Stack interface (ArrayStack and LinkedStack) and learn how to write, run, and interpret your own JUnit tests. To start, please download the JUnit Stack Demo. Load this into Eclipse as a project folder. It is set up automatically to include the junit-4.1.jar library contained in this project, which contains the JUnit library classes.

In general, see the Java/Eclipse-related files on the page reachable by the Online Resources link in the course index. The Download: Course JUnit 4.1 (all files, including .jar and Javadoc) link there contains this .jar file, as well as the complete documentation for using this class (although this lab will cover all that you need to know for this course) You might want to put this .jar file in your workspace and then add it to your standard libraries in the JRE (as you did with the cs15-1xx.library.jar file).

Note: When you look at the StackTest.java file in Eclipse, ignore all the warnings on the collection class operations; when we learn about generic classes, we will see how to correct these warnings: they are not errors so the program will still run.

Generally, for systems comprising many classes, there are two kinds of testing: unit testing and integration testing. Unit testing, which is done first, is concerned with testing classes individually; integration testing is concerned with testing multiple classes (up to testing complete programs). The former deals with the correctness of each class (e.g., constructors establish, and methods sustain, the data invariants: methods change instance variables appropriately and return correct values); the latter with how the classes use each other. For more information see the Testing section in the lecture on Program Construction and Debugging

Extreme Programming (XP) puts a heavy emphasis on unit testing. It dictates that before writing a class, someone (the programmer him-/herself, or a special "test engineer") should write code that will test the class. Aside:In fact, Microsoft pairs programmers and testers: they realize, psychologically, that programmers often make poor testers: they have little incentive to find that they have written buggy code. Bugs are more likely to be uncovered by someone else, who has no vested interest in writing the code. The testing code can be finished immediately after the specifications for the class are finalized. These tests should be extensive, such that if a class passes the tests, it is ready to move to integration testing.

Often in this course we write just interactive drivers to do our unit testing. These drivers give us the flexibility of testing arbitrary sequences of method calls to an object constructed from the class we are testing. It is certainly useful to use such drivers for exploratory purposes, but there is also a strong case to be made for developing more automated testing.

Fundamentally, software changes: we are always improving code (by correcting it, making it run faster, or by enhancing its functionality). When we change code, it is easy to introduce new errors. By writing automated tests, when we update code, we can easily add new tests and ensure that all the old tests still produce correct results. Retesting on updated software is called Regression Testing.

Over the last year or two (the time I have been playing with JUnit) I have become a convert. With alarming regularity, I find bugs in classes that I have been using for years, when I go to the trouble of writing JUnit tests for them. If these test were written first, as XP dictates, the bugs would have been spotted and corrected much earlier.

Reality check. The purspose of most educational courses is to introduce you to new ideas and teach you how and when to apply them, not necessarily to make you use them repeatedly. So, the purpose of this lab is to ensure you are familiar with debugging with JUnit testing and writing your own JUnit tests. Later in the course, I will distribute JUnit tests to help you debug your projects: tests you could write if you had the time. If you do write your own JUnit tests, you are welcome to share them freely with your classmates. Ultimately whether you write your own JUnit tests in the future (in this class, others, or in jobs) is up to your discression. Finallly, it is easy to collaborate with others when writing JUnit tests: you can divide up all the aspects of this task and then reassemble the resulting code easily, because each test is run independently from the others.


JUnit Testing of Stacks In this section, we will look at the JUnit test for classes implemeneting the Stack infterface: ArrayStack and LinkedStack, both already in the class library. Of course, this class is correct (I hope:), but we can still use it to explore JUnit testing: by introducing some errors, we can also see how such errors are detected and reported by JUnit. So, let's start by opening that project in Eclipse. Let's look through the StackTest.java file and note the following.
  1. import org.junit.*;                         //For tags
    import static org.junit.Assert.*;           //For assertions
    The first imports allows us to have access to the necessary tags (a new feature in Java 1.5), which we will use but not explain below. The second import (with the word static) is also new in Java 1.5; this allows us to use all the methods specified in the Assert class WITHOUT prefacing it with Assert (like calling forInt instead of Prompt.forInt: of course, I named my class and methods to be used together -forInt makes little sense without Prompt prefixing it).

  2. The getStack method exists just to act as a factory method; this is the only code that constructs a stack, so this method body determines which implementation of the Stack class were are testing.

  3. The setUp method (it can be named anything) is prefaced by the tab @Before (capitalization is important). This tag causes this method to be executed before each of the test methods to be described below. Note that it initializes one instance variable by constructing a stack, and intializes three other instance variables. All these instance variables are used throughout the other test methods.

  4. The first test method is clear. It is important to understand that each test method will be run independently from the others (this is strange, and requires reflection -something we will discuss later- to accomplish). For example, if a test method fails an assertion, or even throws an exception, it will not affect whether subequent tests are run JUnit takes care of those problems.

    The clear method in this class tests the clear method in whatever stack class we are using. Often testers would write this method name as testClear, as does the automatic JUnit generation mechansism in Eclipse. This test is simple: we push three Strings onto the stack and assert that the stack isn't empty; then we exceute the clear method and assert that it is empty.

    For compatibility with old JUnits, there are two forms of assertTrue. The one you should use specifies a String describing the error and a boolean expression which, if it doesn't evaluate to true means that an error was detected. You may omit the String argument, just writing a boolean expression, and you will see null instead of the message. We will see where this message is printed in a few minutes.

  5. Check the API for the Assert class. In includes the method-pairs assertFalse, assertNonNull, assertNotSame, assertNull, assertSame, assertTrue, and fail; it also include a method called assertSame that is overloaded for all primitive types as well as Object (in a version with/without a String.

  6. The second test method is addRemove. This method first pushes three values on the stack and then ensures that these same values come off in the reverse order. Note that the equalsSame method checks for ==: the same object, not just an .equals one. It also checks for an empty stack at that point (all values should now be removed). We could have checked the size before/after each remove, for an even finer-grain test. Finally, it calls remove in a try/catch: if a NoSuchElementException is caught, the program proceeds normally (it should have thrown that exception with an empty stack); but if it doesn't throw this exception, JUnit is explicitly told it failed a test (which could also be accomplished by the verbose but equivalent assertTrue("...",false) because false is not true.

    The next group of statements performs the same kind of testing in a more complex context: pushing 1000 integers onto the stack and then popping them off, comparing each popped value for correctness. Notice here that the assertion is assertEquals not assertSame, because we are comparing the popped value against a newly constructed Integer wrapper class object: it is not the same but represents an equal state.

  7. Before looking at any more tests, lets actually run this JUnit test and interpret the results. In the StackTest.java editor tab, right click (on a PC, or control-click on a Mac) and select Run As and then JUnit Test (which appears instead of Application). Here Eclipse is smart enough to know to do something special. After you run the program, a JUnit tab should appear to the right of your code as follows.

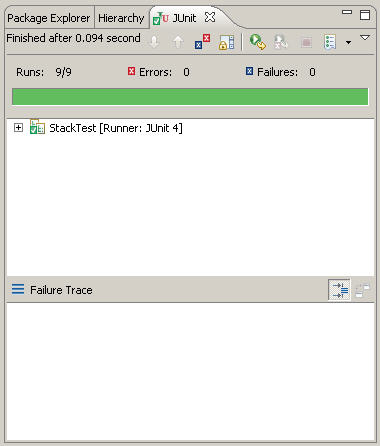
    Because it failed no tests, there is a green check on the StackTest icon and Eclipse leaves the individual tests elided (and nothing appears in the Failure Trace pane. Also note the top line of this tab, which reads
    Runs: 9/9 Errors: 0 Failures: 0

    An error means the code threw an uncaught exception; a failure means that one of the assertions was not correct. The green bar beneath it shows the all tests have finished correctly; for very long tests, this serves as the progress bar, filling in left to right. If any tests fail, this bar will appear red not green. We can click on the +StackTest to see the individual tests.

    Interestingly, these test appear in no order: neither alphabetical or the order in which the tests are written in the StackTest class.

  8. Rather than intoduce an error into any queue implementations, we will write an incorrect test. Note that JUnit fails to distinguish between whether test code is incorrect and whether the code being tested is incorrect: so if a test fails you must double-check that the test is correct and the code is wrong; if not, debug the test and not the code. So let's change Line 85 to assert that the size isn't 0 (which is wrong), and change Line 105 to assertSame (which is wrong: they are .equals but not ==). When we run that test we see the following

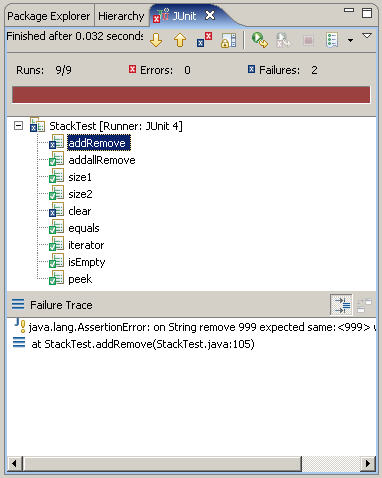
    Notice the progress bar appears in red, not green, and the top line indicates Failures: 2. Then the StackTrace icon contains an X and is expanded, showing Xed addRemove and clear methods. The first failed test addRemove is highlighted. In the Failure Trace pane you will the error on the first line and its location in StackTest.jar; if you click the second line, the editor tab for that file will jump to the appropriate line in the test code.

    The first line (if you scroll to the right) reads in its entirety
    java.lang.AssertionError: on String remove 999 expected same:<999> was not:<999>
    IMPORTANT: For any use of a "same" or "equals" method, always put the argument for the correct answer BEFORE the argument for the one that is being tested; otherwise, you will get very confused by the output. IMPORTANT: For this particular case, the output is confusing because the values look the same; but they are not the same, even if they are .equals -remember the difference.

    Note after a test fails, JUnit terminates the current test method (noting where and why it failed) but continues with all the other tests. In this case, there would have been 999 other failures if the failed test continued to run

    Now, click the clear method in the JUnit tab or click the yellow downward arrow. When you do so, you will see the following.

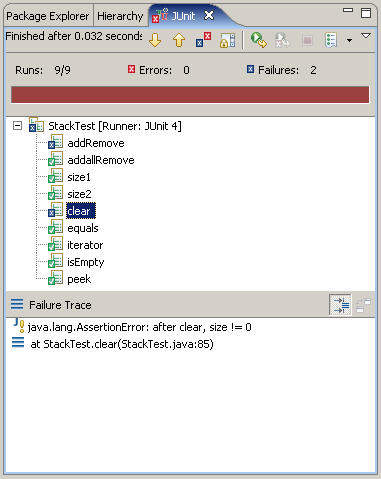
    Notice on the first line only the message is printed here (no values). Note that the error messages don't need to indicate which test method they failed in: that is part of the context in which the error message is displayed: the line number on the second line. If you double click the second line, the code in the editor pane will be repositioned to show the line with the failed assertion.

  9. You can examine the rest of the test as well, although they will not be described any more in this handout. Note that you can terminte the JUnit tab; it will reappear whenever you run the class as a JUnit test. Finally, when you are done, you can remove this project from Eclipse.

A JUnit Test for Sequential In this section, we will look at how to use Eclipse to help you automatically generate a JUnit test for a class. You might immediately ask, "But aren't we supposed to create JUnit tests BEFORE we write the class." Yes, you are: after the class is specified but before you write it. In fact, after you specify a class you should be able to "boiler-plate" in all its constructors and methods, with the right prototypes. You need only these boiler-plated methods to generate the JUnit test. So, if two groups were working together on a class, one group can take the specification (written as a boiler-plated class) and go off to implement the class (by filling in the constructors and methods); the other can take the specification and go off to implement the JUnit test.

In this lab, you will generate a JUnit test for your Sequence class (from Quiz #5). So, first download your code and load it as a project file into Eclipse. Here you will also need to download the JUnit 4.1 information (see the Online Resources link), unzip it, and then build a path to the junit-4.1.jar file. You might want to put this file in your workspace and then alter the JRE to always include that library (as you did with the cs15-1xx.library.jar file).

Next we will create a JUnit test class for Sequential

  • Disclose that project icon and its default package.
  • Right click the Sequential.java file and select New and JUnit Test Case.
  • Select the New JUnit 4 test radio button (if it is not already selected).
  • The Name and Class under test text should be automatically filled in.
  • IMPORTANT: click Next> not Finish.
  • Click the the Sequential class box: checks should appear in the boxes for its constructor and all its methods.
  • Uncheck the box for its constructor: you can control individually which constructors and methods are tested.
  • Click Finish
  • After you disclose the first import line, you should see the following file in your editor tab.

  • Edit the second import to read import org.junit.*; if it says only Test you will not be able to use the @Before tag.
  • Note that it creates standard Java method names using every checked box described above, prefacing each with test.
  • You ran actually run this code now, but every test will fail.
Remember, if you want to have a method called before every test, write it with the @Before tag. Sometimes it is better to write many small tests rather than a few big ones: testRemove1, testRemove2, ... In this way, an assertion failure in one method will still run the other methods; if they all appear in one big test, any assertion failure in the method will terminate it, leaving the other assertions it contains unchecked.

For this lab, try to write a test for remove (which is the hardest method to get right/coordinated with the others via data invariants). Think of a few tests and how to implement theim; then code them in the testRemove method, and see if your code works on them correctly. Let me know if you can write a test that exposes a bug in your code.