Project #1: Perfect Candidate
Due date and time: Friday, April 8, 6:59pm
This project is to be done in pairs using the "pair programming" technique
Introduction
Like many aspects of our lives that we view transparently, when an election comes and we decide to vote, we have the luxury of going to our local polling place — or even just submitting an absentee ballot — casting our vote, and not thinking too much about the work that goes into managing the election. But elections pose a significant logistical challenge. Ballots must be designed and printed. Voter registration lists must be maintained. Only registered voters can be allowed to vote, and each must be allowed to vote only once. It must not be possible to figure out which voters placed which votes. Ultimately, votes must be counted and results disseminated. As with many logistical challenges, the burden of handling elections is increasingly being placed on computers; these kinds of logistics are among the things that computers handle best, though automated solutions present their own problems when not designed and built carefully.
In recent years, various on-paper voting mechanisms have been replaced with electronic voting machines. This project will let you explore the design and implementation of software for a highly simplified voting machine that allows users to cast votes for one race (say, Mayor of Simpleton) and counts the number of votes for each candidate. I should be careful to point out that the design of a viable real-world voting machine requires a fair amount of care; it is important to note that our voting machine lacks a number of important features — not the least of which is some form of security mechanism — that are essential in a realistic one.
Choosing a partner
Before going any further with the assignment, choose a partner from among the people in lab with you. (It's fine, even preferable, to read this project write-up on your own ahead of time, though, so you and your partner can hit the ground running in lab.)
If you're having trouble finding a partner, notify your TA, so that you can be assisted in finding one. If you have not found a partner and notified your TA of the pairing by the end of the lab meeting on Wednesday, March 30 you will be assigned a partner and notified via email; once your TA has selected a partner for you, we will not allow you to switch to another one.
You will not receive credit on this assignment if you work on it alone, without the prior consent of the instructor. (Please note that "prior consent" does not include approaching us the day the project is due, having completed it on your own, and telling us that you haven't been able to find a partner.)
Be sure, too, that you've read the section entitled "Pair programming" on the Introduction to the Projects. The way we're doing business in ICS 22 / CSE 22 is essentially the same as it was in ICS 21 / CSE 21 last quarter, but there are some subtle differences, and it's worth knowing about them up front.
The program
Our program is the software for a simplified voting machine with a graphical user interface (GUI). When started up, it reads information about a single race from an input file, then displays a ballot. The ballot can be used to cast votes indiscriminately — there's nothing in our program that forces users to "log in" or otherwise identify themselves before casting a vote — with the votes being counted underneath the covers, but not displayed to the user while the voting is in progress. After closing the ballot window, the program saves the results of the election into an output file, formatted in a particular way.
Starting point
To give you a more realistic context for your project, I've implemented the complete GUI; I've given you the Java code for the classes that comprise the GUI, but you will not need to read, understand, or modify that code in any way. (Still, you can check it out if you're interested. Even a cursory glance will demonstrate that coding up even simple user interfaces like this one can be a complicated process!)
I've also provided a skeleton implementation of the "model," the classes that implement the underlying engine for the program, which handles tasks like reading the input file, writing the output file, and counting the votes. You are not permitted to modify the signatures of the methods that I've provided in the engine classes. This restriction is motivated by one practical need: my GUI code expects these methods to have the same names, take the same kinds of parameters, and behave (outwardly) exactly as specified. If you alter the signatures of these methods, the GUI code will no longer compile or work.
The starting point is available in a Zip archive.
Getting started on your project using Eclipse
It's best if you work on this project (and all subsequent Java projects) within the same Eclipse workspace that you downloaded and used for In-Lab Project #0. If you haven't done that project, it would be a good idea for you to go back and follow through its steps; it shouldn't take very long, and it will acclimate you to the Eclipse environment that we'll be using for the rest of the quarter. If you did the assignment, but lost or no longer have access to your workspace, go back to that assignment page and download the workspace again, then continue to use it for the rest of the quarter.
Follow the same steps as you did in the in-lab assignment to create a project and import the starting point code into it. Name the project PerfectCandidate. You'll then be ready to get started.
Once you've imported the code, you can compile the program, but it will not work correctly until you've implemented at least some of the methods.
What do I need to implement?
You'll be writing code in four classes:
- Candidate, each object of which represents one candidate on a ballot, consisting of a name, a party affiliation, and the number of votes received by that candidate so far.
- Ballot, each object of which represents a single ballot, consisting of an ArrayList of Candidates, as well as the name of the office that is up for a vote.
- BallotReader, which consists of a single static method that reads a ballot from an input file.
- ResultWriter, which consists of a single static method that writes the election results into an output file in a format specified in detail later in this write-up.
Each of the methods in these four classes are commented but not implemented; your job will be to fill in the implementation of all of these methods. You do not need to read, understand, or modify any of the other code. (You're welcome to read through it if you'd like, but you are not permitted to modify it.)
I suggest working on these classes in the order listed above. Once you've implemented Candidate and Ballot, the program should compile and run, though the ballot will always consist of the same candidates — because the provided BallotReader just constructs a hard-coded ballot instead of reading one from an input file — and the program will not write any output — because the provided ResultWriter does nothing.
A word of warning about contracts
As you work on this project, you and I have made an agreement, a contract, of sorts. I've provided the GUI in its entirety; in return, you're required to write your code according to the provided specification. If your code deviates from the specification — say, a method returns null when it's not supposed to — it's entirely possible that my GUI will behave unpredictably or even crash.
(This illustrates an important point about building large-scale software: When many people work together on a large project, it's important that they agree on what the interfaces between their parts are. In this case, you and your partner are collaborating with me — my GUI depends on your engine — and our agreement is that your engine conforms to the specification provided. Naturally, the larger the software and the more people and pieces involved, the more important these kinds of agreements become.)
If you're not sure whether your methods follow the specifications, one way to solve that problem is to test them. We'll discuss testing a bit later in the quarter, and you'll gradually be required to demonstrate more testing on each project. For now, you can write code that creates objects, calls methods on them, and prints their output to the console, so that you can check whether the output is correct. It would be wise to write your tests in a separate class with a main method, so you can execute the program itself normally, or execute the tests by running your test class instead.
Reading the input file
Input file format
The program reads ballot information from an input file, an example of which follows:
    Mayor of Simpleton
    3
    Joe Incumbent;Powerful Party
    Mark Challenger;Less Powerful Party
    Gene Unpopular;Nobody Party
The first line of the input file specifies the name of the office that is being voted upon. The next line consists of a number that specifies how many candidates are running for the office. If that number is n, the next n lines each specify a candidate, with the candidate's name appearing on the line first, followed by a semicolon, and followed by the candidate's party affiliation.
You may assume that the input file will always be properly formatted according to this specification. If it's not, it's fine for your program to misbehave or even crash; we will only test your program with valid input files.
A couple of hints
- Scanners are capable of reading one line of input at a time from any input source, including a file. I suggest always reading the file one line at a time, then processing the line.
- In addition to being able to read one line of input at a time, Scanners can also read one "token" at a time. The definition of a token is flexible and can be handled differently in different circumstances. By default, tokens are separated by spaces (or line breaks), so that the string "123 456 789" contains three tokens: "123", "456", and "789". However, there are ways to change this behavior; one way is with the useDelimiter() method. (See the Java API documentation about Scanner for more details.)
- Scanners can also be wrapped around Strings, to be used in breaking the String into smaller pieces. In this example:
    String numbers = "123 456 789";

    Scanner s = new Scanner(numbers);

    while (s.hasNextInt())
    {
    System.out.println(s.nextInt());
    }
the output of the code fragment is:123 456 789This technique will come in handy for reading information about each candidate, since there are two pieces of information on each line, separated by a semicolon.
Formatting your output
In this program, you won't just be printing unformatted text to the console using System.out.println; you'll instead be writing a nicely formatted output file that indicates the results of the election. (Unrealistic as it may be in any but the most local of elections, we'll assume that there is only one voting machine being used by all voters.) An example of the output format follows:
    RESULTS - Mayor of Simpleton
    ----------------------------
    Joe Incumbent - Powerful Party                 77
    Mark Challenger - Less Powerful Party         105
    Gene Unpopular - Nobody Party                   1

    WINNER: Mark Challenger - Less Powerful Party
The details of the output format are:
- The first line begins with the word "RESULTS", followed by a space, a dash, another space, and then name of the office that users voted for.
- A line of dashes, where there exactly as many dashes as there are characters on the first line.
- For each candidate on the ballot (you can list them in the same order they appear on the ballot; it's not necessary to sort them by the number of votes), with each candidate appearing on a separate line:
- The name of the candidate, a space, a dash, a space, and the candidate's party affiliation. Collectively, we'll call this the candidate's tag.
- The number of votes received by that candidate.
- The candidate names should be left-justified in the first column of the output.
- The numbers of votes should be right-justified in the last column of the output.
- To calculate how many columns your output should have total, first figure out the number of characters in the longest tag for any candidate. (In the example above, "Mark Challenger - Less Powerful Party" is the longest tag, consisting of 37 characters.) Then, add 12 to the length of the longest tag.
- A blank line appears after all of the candidates are listed with their vote totals.
- Finally, a line that indicates the winner, with the word "WINNER", a colon, a space, and the winning candidate's tag.
- In the event of a tie, this line should read "NO WINNER" instead.
When you want to write formatted output, with left- and/or right-justification within certain numbers of characters, the String.format( ) method helps; it knows how to take data of various types, format it according to your specifications, and return it to you as a String. The first parameter you pass to it is called a format string, which is used to tell it how you'd like the data to be formatted, with placeholders for the data. Subsequent parameters specify the data that will replace the placeholders. Here's an example from a hypothetical Person class:
    String s = "";
    s += String.format("%-10s: %s\n", "Name", name);
    s += String.format("%-10s: %s\n", "Title", title);
    s += String.format("%-10s: %4d\n", "Height", height);
    s += String.format("%-10s: %4d\n", "Weight", weight);
    System.out.println(s);
This code might generate the following output for a hypothetical person and print it to the console:
    Name      : John Doe
    Title     : CEO
    Height    :   71
    Weight    :  190
In the format string, each occurrence of the % character indicates a placeholder for a piece of data. It is followed by a letter such as s (for a String) or d (for an integer), with an optional number in front of it that indicates justification (a positive number means to right-justify, while a negative number means to left-justify). In the example code above, you can see the placeholder %-10s, which means to print a String left-justified within 10 characters (i.e., with extra space added after it so that it fills up at least 10 characters). The placeholder %4d means to print an integer right-justified within 4 characters (i.e., with extra space added before it, if needed). The placeholder %s simply means to print a String, with no extra spaces added before or after it.
If the format string has two placeholders in it, as in the example code above, you'll need to supply it with two parameters that supply the data. For example, this line:
s += String.format("%-10s: %4d\n", "Height", height);
...tells the method to left-justify the text "Height" within 10 characters, follow that by a colon and a space, and follow that with the integer height right-justified within 4 characters. The \n you see at the end of the format string says to insert a newline character, so that subsequent characters will appear on the next line when the String is printed.
This is a great tool that you can use to format your output to make it look nice; I expect you to use it to format your output as specified.
What else might I need from the Java library?
You will find some or all of the following classes and methods in the Java library useful. Sometimes, you'll find that you need to know details about how they work that we haven't yet talked about in class. When you need more information about them, see the Java API documentation, which describes all of the classes and methods in the Java library. (You probably won't find that you'll need to read all of the documentation. The trick with documentation, when there's as much of it as there is in the Java API, is to know what you're looking for and focus on that, rather than reading everything.)
- ArrayList
- FileReader
- FileWriter
- IOException
- PrintWriter
- Scanner
- String.format( )
- String.length( )
Note that you may well be able to finish this project without using everything on the list above. Java has a large, industrial-strength library, which means that there are often many ways to accomplish the same goal. The ones listed above are the ones that will likely present the simplest path to a solution, but your prior experience may have turned you on to different choices; for the most part, that's fine.
Testing
Perhaps the simplest way to test a program is to execute it and observe its output for various inputs. For a program such as this one, whose input comes from a user interface, in addition to an input file, this means running the program, trying various combinations of inputs by hand, and observing the program's behavior. The primary advantage of such a testing strategy is that it doesn't require you to write additional code. On the other hand, the need for you to actively run the test cases — by typing and/or clicking your mouse one step at a time — and assess the output by reading it and comparing it to the expected output is a major disadvantage, particular with regard to the repeatability of the tests. In other words, if you want to run the tests several times as you debug your program, you'll have to manually execute your tests each time, manually comparing the output to the expected output. Still, for our relatively simple program, this strategy will suffice. As the quarter progresses, we'll discuss and use better testing strategies.
To satisfy the Testing portion of this project, you'll write a test plan. A test plan is a series of test cases, each of which is specifically chosen to demonstrate that some particular portion of the program works correctly for a particular class of input. For example, here is a test case which addresses the problem of attempting to deposit a negative amount of money into a savings account using an ATM:
Test Case: Negative deposit amount into savings
Purpose: Ensures that users may not deposit a negative amount of money into a savings account. Only positive deposit amounts should be legal.
Steps:
- From the program's main command prompt, enter a "view balance" command.
- When asked to select an account to view the balance of, select the savings account.
- From the program's main command prompt, enter the "deposit" command.
- When asked to select an account as the target of the deposit, select the savings account.
- When asked to enter an amount, enter a negative amount, such as $-15.
Expected Output: After entering the negative amount, the program should display an error message indicating that negative amounts may not be deposited. The savings account balance should not have changed.
Additional Comments: It might be useflu to run this test cases for two or three different negative amounts.
You should format your test cases similarly to the style above, including Test Case, Purpose, Steps, and Expected Output sections. If the contents of the input file are relevant to a particular test case — they often will be — include a section Input File that shows the input file's contents. If you do not have any additional comments to make for a particular test case, you may leave the Additional Comments section out.
You may use any software you'd like to write your test plan, but you may not handwrite it. Submit it in either Microsoft Word format (.doc), Rich Text Format (.rtf), PDF format, or as a text file. Unfortunately, if we can't open your document, we won't be able to grade it, so please be sure to use one of these four formats.
Note, also, that you are required work on your test plan using the same "pair programming" technique that you use for writing your code. Two heads are really better than one when it comes to testing.
Take a few minutes when writing your test plan to make sure that it's written clearly; we're certainly not looking for fine literature here, but a few minutes spent cleaning up the grammar and spelling will be much appreciated, and will be reflected in the score you receive.
Normal, error, and boundary cases
There are three kinds of test cases that I'd like you to focus your attention on:
- Normal cases. A normal case is a test case that exercises some ordinary function of the program using valid input. For example, depositing $20 into an ATM constitutes a normal case, since it is legal. We would expect to see the account's balance increase by $20.
- Error cases. An error case is a test case that verifies that the program correctly handles invalid input or other error conditions. For example, withdrawing $30 from an account with only $20 in it constitutes an error case, since the program will not perform normally (i.e., withdraw the money) in this case.
- Boundary cases. Sometimes, programs work correctly in normal cases as well as most error cases, but misbehave on the boundary between the normal and error cases. For example, it is useful in an ATM to test what happens when you attempt to withdraw the exact balance of an account (leaving $0 remaining in it). Test cases such as these often highlight a program's most serious flaws, when you've made a mistake such as using "<" where you should have used "<=".
Additional Eclipse skills that might come in handy
Creating a new class in Eclipse
It's possible — and, in fact, perfectly reasonable — to do this project without creating any new classes. Still, in case you want to create any, or in preparation for future projects (where you will definitely be creating new classes), let me take you through the steps in Eclipse for creating a new class.
When you want to create a new class in your PerfectCandidate project:
- Make sure that your PerfectCandidate project is selected in the Package Explorer. (In other words, click once on the entry for PerfectCandidate, so that it is highlighted.)
- From the File menu, select New, then Class.
- You'll then see a dialog box pop up that looks like this:
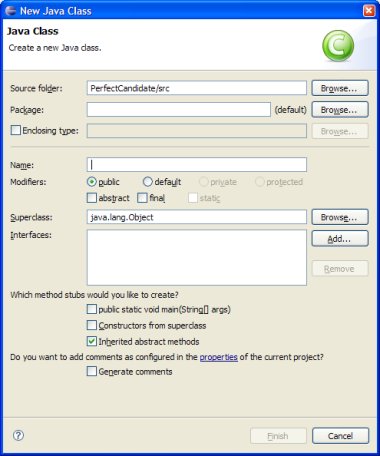
In this dialog, you can tell Eclipse what it needs to know in order to create your new class. The only thing you'll need to specify is the name of the class, which you can type into the Name: field, where the cursor is displayed in the above screenshot; the default is fine for all of the other settings (for now). When you type the name of the class, you'll see a warning appear near the top of the dialog that says "The use of the default package is discouraged"; it's safe to ignore that warning for the time being. - After you've typed the name of your new class, click the Finish button in the class creation dialog and Eclipse will create a new class for you. A new .java file with the appropriate name will be added to your project, and it will contain an empty class declaration, ready for you to write code into it.
Deliverables
It is only necessary for one of the two partners to submit the project; the TAs are aware of the partnerships, and will figure out which project submissions belong to which pairing. Put the names and student IDs of both partners in a comment at the top of each of your .java files, then submit all of the .java files, including the ones that we provided to you, to Checkmate. Also, submit your test plan in either Microsoft Word format (.doc), Rich Text Format (.rtf), PDF format, or as a text file. Please do not turn in the .class files, or other files generated by Eclipse. Afterward, take a moment to be sure that you submitted all of the files; if you missed one, we won't be able to compile and run your program, which can result in a substantial penalty, since we won't be able to evaluate your program's correctness.
Follow this link for a discussion of how to submit your project via Checkmate. Be aware that I'll be holding you to all of the rules specified in that document, including the one that says that you're responsible for submitting the version of the project that you want graded. We won't regrade a project simply because you submitted the wrong version by accident.