Problem Summary:
I have written the view and controller modules for this simulation; I have also included some base classes used in the model module. You will write the complete model module, and a variety of classes derived from the base classes by inheritance. You will also use the names controller.the_canvas and controller.the_progress to update what is in the view. The former starts with a width 500 pixels and height 300 pixels (the origin, (0,0) is in the upper left-hand corner, with x values getting bigger going right and y values getting bigger going downward); the user can resize the window and the simulation should respond accordingly. The later is a label whose text can be updated by calling the config method.
The inheritance hierarchy looks as follows (arrows go from sub-/derived-classes up to their super-/base-classes). All classes that do not specify base classes have object as their base class. Most classes have just one base class: only the Hunter class inherits from two base classes.
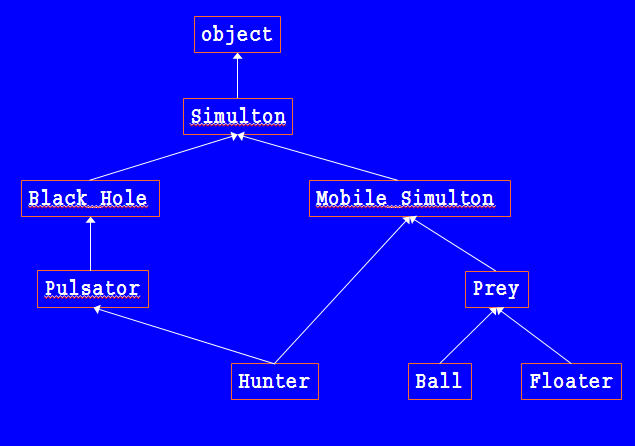
Here is a brief description of each class; each is discussed in more detail later in this document. Recall that you will also be writing the model module, which does not appear in this hierarchy, but uses objects constructed from the classes in this heirarchy.
- The Mobile_Simulton base class stores the angle (in radians) and
speed (in pixels/update) of every mobile object in the simulation
(and inherits the information controlled by the Simulton class).
It includes methods to query and update this information.
- The Prey base class is an ancestor of every class that produces
"edible" objects; it contains only code to call __init__ for
Mobile_Simultons (it base class).
- The Ball and Floater classes represent balls (traveling in
straight lines) and floaters (travelling more eratically) that traverse
the simulation canvas.
They are both subclasses (and thus instances) of Prey so they can be
"eaten" by Black_Holes, Pulsators, Hunters,
- The Black_Hole class represents a stationary object that eats
(removes from the simulation) any Prey object whose center
becomes contained its perimeter.
- The Pulsator class represents a special kind of Black_Hole:
one that gets bigger (as it eats Prey) and smaller (as it starves);
if it gets too small (starves for too long) it dies: removes itself from
the simulation.
- The Hunter class represents a special kind of Pulsator:
one that is mobile (hence its two base classes), and moves towards the
closest Prey that it can see (there are limits to its vision).
When you define these classes, you should not modify any code written in their base classes. You should also not access by name or duplicate an instance variables (attributes) that are inherited. You can call methods in the bases classes to access/update their instance variables and override any methods in the base clases (whose bodies might call the overridden methods to help them accomplish their task). You can also define new methods. Each leaf class must define or inherit an update and display method, which respectively implement the behavior of objects in that class and the image that they display on the canvas. When called from the model class, the update method takes a second argument that is reference to the model class, and the display method takes a second argument that is a reference to the canvas (from the controller class).
Finally, you must develop one more class, named Special that appears somewhere in this hierarchy, and exhibits interesting behavior. Feel free to define supporting module/classes if necessary.
I suggest that you start by looking at the code in the modules that appear in the project folder that you will download. Then (see the detailed instructions in this document) you can add/test/debug each of the derived classes in the hierarchy, starting near the top and moving downward to the bottom, until all classes are implemented and behaving as they should.
Details
I have written the Simulton, Mobile_Simlton and Prey classes, which you need to understand and use, but do not need to change. Note that the Simulton class defines a contains method that is inherited and can be overridden (and should be, in Black_Hole, which changes the meaning of containment). This method determines whether an (x,y) coordinate is inside the object by checking whether it is contained in the bounding box of each object: the bounding box is just all coordinates extending from the object's center, going half-height up and down, and half-width left and right. The Black_Hole class overrides contains to be whether an (x,y) coordinate is inside the perimeter of the object: this is a "smarter" contains that actually knows about the shape of its simulton, not just the generally useful bounding box.Important: The main goal in writing this derived class is to use inheritance to write small classes that usefully inherit the maximal amount of behavior and state from their base classes, requiring us to write only the minimal amount of code/instance variables for them to behave and display as required. Ideally, each class (and only that class) should control the instance variables it defines. To meet this goal, study the methods inherited from the Simulton and Mobile_Simulton classes. When you write an __init__ method, typically call the __init__ method in a base class directly.
- You should start by writing the Ball class, which should be simple
because of the state/methods it inherits: each Ball is blue, has
radius 5, moves at 5 pixels/update, and starts moving at a random angle.
Hint: 3 methods (__init__, update, and display), no new
instance variables, 1 class variable for the radius constant.
- Next write enough of the model module to test this module and the
Ball class.
Write the world, reset, start, stop, step,
select_object, mouse_click, add, remove,
find, update_all, and display_all functions, most of
which can be tested using only Ball objects; as you write more classes
later, you will continue to call/test these functions.
The step button stops the simulation after executing one cycle: if it
is running, it stops after one more cycle: if it is stopped it starts for one
cycle and then stops again.
The select_object function remembers (using a global name) the string of
the button clicked (which it is passed as an argument: see
object_button in the controller module; the mouse_click
function creates an object from the last remembered selection at the (x,y)
coordinates of the click: using eval makes this method small, and
easily extendable to other classes of simultons.
The __init__ method of every Simulton subclass is called with
only the (x,y) 2-tuple, supplied by the mouse_click function.
See the model class in program5helper for many useful details.
Important: The code in the model class should define only one set that contains all the simultons. When you loop over this set (in udpate_all and display_all) you should not call the type or isinstance functions. Just call update and display on each simulton which executes the code for its kind of objects. Recall all update methods are passed a reference to the model module and all display methods are passed a reference to the_canvas declared in the controller module: the model module has access to and supplies this infromation. DO NOT write a different set for balls, floaters, etc.
- The Simulton base class stores the location (x,y coordinates of the
center) and dimensions (width and height) of every object in the
simulation.
It includes methods to query and update this information.
Recall that a method or function can use the value of any (global) module variable in its body, but if we need to update the binding for any (global) module variable, we need to declare that (global) module variable global in the method/function. You can help debug your model module functions by having them print useful information in the console when they are called.
- Write, test, and debug the Floater class, which is similar to the
Ball class, with two important differences: they are displayed as
images (a UFO icon) and they move in a strange way.
Ensure the user can add Floaters to the simulation.
Initially, each Floater moves at 5 pixels/update, and is moving at a
random angle.
IMPORTANT: To process the GIF file (a flying saucer) for a floater, you need to download and install Pillow. See the instructions at the bottom of this document. But, you are NOT required to download/install Pillow. You can (with no loss of credit) implement floaters similarly to balls: using a radius 5, but as red circles; you might want to implement floaters this way first, and then try to switch to the flying saucers only if you have time to download/install Pillow.
To process the Floater's image using Pillow (if you elect to use Pillow)
- To access the PhotoImage class from PIL.ImageTk module, we must import PhotoImage and store into an instance variable the image returned from PhotoImage(file='ufo.gif') whose .gif file must be in the project folder. We can call the width() and height() methods on this image to compute the dimensions of the image.
- Use the create_image function to place the image at its location
on the_canvas that is defined/set in the Controller module
(similar to the create_oval method used in the Ball class).
I wrote
def display(self,the_canvas):
    the_canvas.create_image(*self.get_location(),image=self._image)
To move the Floater
- Use random numbers so that 30% of the time both the speed/angle are changed, and 70% of the time neither is changed.
- The speed is changed by a random value betwen -.5 and +.5, but never drops below 3 pixels/update or rises above 7 pixels/update; and the angle is changed by a random value betwen -.5 and +.5 radians.
Hint: 3 methods (__init__, update, and display), 1 new instance variable for the PhotoImage (if you implement that), otherwise 1 class variable for the radius constant.
- Write, test, and debug the Black_Hole class.
Ensure the user can add Black_Holes to the simulation.
Each Black_Hole is black and has a radius of 10.
Override the contains method so that a point is contained in the
Black_Hole if the distance from the center of the Black_Hole
to the center of the object is less than the radius of the Black_Hole.
Use the find method in the model module to locate all objects
that are instances of Prey (or any of its subclasses no matter how
many are added later) and whose locations are contained in the circle
representing the Black_Hole.
The update method should return the set of simultons eaten: this
information will be useful when inherited from the Pulsator class
(which extends the Black_Hole class).
Hint: 4 methods (__init__, update, display), and
contains), 1 class variable for the radius constant.
- Write, test, and debug the Pulsator class.
Ensure the user can add Pulsators to the simulation.
Each Pulsator behaves and initially looks like a Black_Hole,
except for the following additional behavior.
For every object a Pulsator eats, its dimension (both width and height)
grows by 1 and its "time between meals" counter is reset; whenever it is goes
30 updates without eating anything, its dimension (both width and height)
shrinks by 1; and if the dimesions ever shrink to 0, the object starves and
removes itself from the simulation.
A non-eating pulsator (starting with radius 10: width and height 20) will
shrink to 0 in 600 cycles: 20 times it shrinks its width and height by 1).
The update method should still return the set of simultons eaten.
Hint: 2 methods (__init__ and update), 1 self variable -for
that pulsator's counter-, and 1 class variable for the counter constant of
30).
- Write, test, and debug the Hunter class.
Ensure the user can add Hunters to the simulation.
Each Hunter behaves and initially looks like a Pulsator,
except for the following additional behavior.
A Hunter always moves at 5 pixels/update, and intially is moving at a
random angle.
Use the find method in the model module to locate all objects
that are instance of Prey (or any of its subclasses no matter how many
are added later) and whose locations are within a distance of 200 of
the Hunter (hint: see the methods in the Simulton class); if
any are seen, find the closest one and set the hunter's angle to point at
that simulton: to hunt it.
Hint: To determine the angle, compute the difference between the y
coordinates and the difference between the x coordinates of the center
of the closest prey simulton minus the center of the Hunter.
Instead of dividing them to compute the tangent of the angle between them
(and then calling math.atan to compute the angle), just call the
math.atan2 function (with these differences as separate arguments) to
determine the angle the Hunter should move to head towards the prey.
By using math.atan2 and avoiding the division, there will not be a
"divide by 0" problem, if the prey is directly over the hunter (have the same x
coordinate):
The Hunter class inherits some behavior from Pulsator and some from Mobile_Simulton. When calling inherited methods, be careful that the correct one is called. Hint: 2 methods (__init__ and update), 1 class variable for the distance it can see constant of 200).
- Write, test, and debug the Special class.
Ensure the user can add Specials to the simulation.
Make the Special objects do something interesting; write a comment at
the top of the special.py module that describes their behavior so the
TA can read it and watch that behvaior when running a simulation.
If you need to, you can modify you model module or other classes to
interact with these Special objects, but the other classes must work
as specified above after the model changes.
Try not to have to change the model class.
Testing
If the program is developed in the manner described above, testing for the model module is done after its code and code for the Ball class are written. The step function is useful for "slowing-down" simulations to better observe the behavior of the simultons. As each new class is written and entered into the simulation, its behavior and appearance are tested (possibly correcting functions in the model module as they are used more extensively in later classes).You might find it useful (but it is not required) to write __repr__ and/or __str__ classes for each class and print them occassionally for debugging purposes.
You can download and watch (~4 minutes) a narrated demo of me running my solution, to see how the simultons behave. Unfortunately, it does not show the mouse cursor, but when buttons are clicked they momentarily appear depressed. Here is the script for the movie.
- The simulator begins stopped, with no objects on the canvas.
- I can click the Ball button, and then click anywhere on the canvas, multiple
times, to place balls.
-
I can click the Start button to start the simulation.
Notice how the balls move in a straight line and bounce off walls.
I can click on the canvas to add more balls.
- I can click the Stop button to stop the simulation.
- I can click the Start button again to restart it from where it was stopped.
- I can click the Step button to run the simulation for one cycle.
I can click this button any number of times; each click advances one cycle.
This button can be useful for debugging.
- I can click the Remove button.
Then the next time I click on the canvas, any object that I click inside will be
removed from the simulation; this feature works whether the simulation is
running or not, but is easiest to use if the simulation is stopped.
- Finally, I can click the Reset button to reset the simulation.
It is stopped with all simultons removed.
- I have now demonstrated every kind of button in the simulation.
Let's look more closely at how other kinds of simultons behave and display.
- I can restart the simulation and click the Floater button to place floaters
on the canvas.
Notice how each moves differently than a ball, while still bouncing off walls.
- I can click the Black_Hole button and place a black hole on the canvas.
Notice how it eats any prey simulton whose center enters its perimeter.
- I will now remove the black hole.
- I can click the Pulsator button and place a pulsator on the canvas.
Notice how when it eats a simulton it grows; if it doesn't eat any simultons in
30 cycles, it shrinks and ultimately it can remove itself from the simulation
if its size shrinks to 0.
- I can click the Hunter button and place a hunter on the canvas.
Notice how it pursues prey (within its range of vision) and grows and shrinks
like a pulsator.
- Finally, I can reduce or enlarge the size of the window and simultons adapt their behavior to the smaller or larger canvas.
- The simulator begins stopped, with no objects on the canvas.