Before embarking on your first lab assignment, there are some preliminaries you must learn (in addition to the basic Web and Windows skills that got you to this page): lab use policies, how our labs are set up, how to log into the ICS computer network, how our printing system (PayPrint) works, how to read and post to news groups from our lab, and, importantly, the basics of entering, compiling and running Java programs.
So, this rather lengthy orientation helps you master these preliminaries. We’ve put together a series of pseudo-lab exercises that let you (with your partner, if you’ve formed a team already) practice and apply the material as it is presented. Read all of this orientation section; practice the parts that are new to (either of) you, or for which you need review; do the activities needed for the class (e.g., activating your computer accounts) you’ve not yet done.
Pay attention to the details given here, as common computing tools or activities are often somewhat different in lab than, say, on your home computer. For example: Many of you know how to use Thunderbird or Microsoft Outlook to process email. But, since lab machines are shared, we don’t use these tools; we instead have you connect to your UCInetID account through the Web using a tool called WebMail. So though you may know how to do email, you may not know how to do it from lab.
Each of you must read a few documents stored on the Web that address ethical use of computing resources and academic honesty issues. (You may also be asked to read some of these documents in the course of activating computer accounts.) We require you to read these documents because, unfortunately, a few students in the past have abused their computer privileges or acted dishonestly and claimed ignorance of the wrongness of their actions. Do note that remaining or enrolling in this course binds you to abiding by these rules.
Go to the Web page ICS Instructional Lab Guidelines. Read the documents it references.
Read the UCI Academic Senate Policies on Academic Honesty and the Information and Computer Science Cheating Policy.
These documents cover several important policies about academic honesty that apply to you.
If you have not yet activated your UCInetID, go to the UCInetID Activation page, click on Faculty, Staff and Students and follow the instructions. Be sure to have your student ID and social security number handy; you’ll need them to complete the activation process.
If you are already enrolled in the course, or a major in the Bren School, the School has already created your ICS account. If you are waiting to add the class (and are not a Bren School major), your account will be created a day or two after you enroll. You need to activate your ICS account to use it: Go to ICS 364; bring your UCI student ID card with you. Find the lab attendant and ask her or him to activate your account. Your ID will be verified; you then take an on-the-computer quiz about the rules regarding use of ICS computer resources and provide a password. Your account is now ready for use. For details on activating ICS accounts, see the Account Activation Web page.
While you are waiting to add the class, you can use our “guest account”:
| Login: | ics-temp |
| Password: | Anteat3r |
Obviously, the account is public, so don’t store any personal information or work there (copy it to a memory stick or elsewhere and delete it from the hard drive right before you log out).
The guest account is typically locked about week three of the quarter, so be sure to activate your own account by then.
Your ICS account also provides you access to a Unix account that has the same login name and password. We won’t log on to the Unix account in this class, but if you use your “H drive,” you’ll actually be using the disk storage that comes with this account.
It’s possible some particulars of the network will change after this lab manual has been printed; we’ll announce any changes that materially affect the instructions given here. That said...
Each first-floor ICS lab room has from 30 to 45 workstations or clients forming a local area network (or LAN); Windows 7 Professional is the operating system for each station. Each machine is an IBM-PC compatible that has more than enough horsepower for the work we will be doing in this class. There are also shared printers and several shared disk drives (called file servers). Each LAN connects to other LANs thoughout the ICS buildings and, through various mechanisms, to other computer networks and the Internet.
Some machine have a diskette drive that accepts 3-1/2" diskettes in IBM format only. All have a CD-ROM drive that can read both “computer” and music CDs, and USB ports that can accept memory sticks and portable hard drives, among other devices. Each machine also has a large local hard disk, where we store software for your use and where you can temporarily store your pair’s work—once you leave lab, you must remove all your work (and only your work, nothing else) from the hard drive; more on this below.
Through your station you can also access the class file server and use the shared printers.
A word about rocking out while you compute: Yes, it’s true: You can bring your own music into the lab, on iPods or MP3 players or whatever, and listen to it while you compute—as long as you listen through headphones or earbuds and otherwise do not disturb your neighbors. We’re amazed how loud some of you play music. Loud music can permanently damage your hearing, and can be heard throughout the lab, even if you wear headphones. So, keep the volume down. If you do not, we may forbid you from listening to music (or anything else) in the lab. (See the ICS Instructional Lab Rules for more on this matter.)
During lab exams, you may not listen to music, or anything else, via an electronic device: What you are listening to might be material to which you are not supposed to have access during an exam.
Logging on: Unlike some other local area networks, Windows requires you to log on to the network with a user name and password, even if you don’t plan to use network resources.
When you sit down at a lab station, it could be in a number of states, depending on whether the last use of the machine logged off (properly) or shut the machine down, or whether the computer has entered a power-saving (sleep) state. So, Help Cener staff will instruct students in how to log in from various states as part of the first days' orientation to lab and the class. Of course, do ask questions as needed!
About your password: You will want to change your password whenever you think it has been compromised. To do so, hold down Ctrl and Alt and hit Delete. A dialog box will appear; choose Change a Password…, fill in the old password and new password (twice) as prompted, and then press Enter to make the change. If your password change is accepted, you’ll get a message to that effect; if it was not successful, you’ll be told that as well; read the message, dismiss it, and try changing your password again. Keep at it until you enter an accepted password.
Remember your password! No one can look up your password–it’s encrypted. So, if you forget your password, you will have to send electronic mail to helpdesk@ics.uci.edu to request that it be set to a new one (that you’ve given in the message), wait a day or two for the change to occur, and then log in and change your password so that (again) no one knows what it is.
When you are done using the computer:
Be sure to exit any applications you had open.
Make sure to back up any work you wish to keep, and be sure to take any diskettes or portable memory devices with you. Keep them in a safe place, away from magnets (like speakers or telephones), intense heat (like your dashboard), and the (filled) bathtub.
Make very sure you have deleted all of your work, but only your work, that you were keeping on the computer’s hard disk.
Click on worl icon at the lower left of the screen, click on arrow next to the Shut Down label, then choose Log Off from the menu that pops up. This step logs you out, and leaves the machine in the logon state, ready for the next user. Logging out can take several seconds; please be patient.
Be sure to log out; if you do not, the next person who uses the machine has access to your account! Please, always leave the machine in the logon state.
We do not require printouts of any kind in this class, but you may find you wish to print some of the course materials, such as all or part of the Lab Manual, for easier reference. (After all, you don’t have to have a computer handy to read printed materials.)
ICS and OIT computer labs use the PayPrint system to provide printing services. Instructions for using PayPrint in ICS labs is at Printing in the Labs; the PayPrint system in OIT labs works the same way. Note you have to purchase a PayPrint card to use this facility.
Since the PayPrint system provides you access to printers in labs across campus, be sure to print to the station you intend, so that your output will go where you expect. (Otherwise, you might be taking a very long walk to get your output!) It’s usually best to send your printout to a station in the room you’re in.
You should know how to back up your work to diskette, memory stick, or portable hard drive. You can also back up your work by copying it to the H: drive. H: will be “mounted”—made available to you—when you log in; it corresponds to disk storage associated with your ICS Unix account. You use the H: drive the same way as you use the C: drive. Storage there is ample for this course, but if you start storing all sorts of things there, you may find yourself out of room. You can get to the H: drive by clicking on Start, then My Computer, then double-clicking on the H: drive icon (it is under the Network Drives section of the window and is the one with (H:) as the last part of its label).
It is your responsibility to safeguard your work—and that includes making backup copies of it. If you lose your work, and you don’t have a backup, you will get no mercy from us: in particular, the lab exam date will not be changed for you. If you have a backup, and it too fails because of circumstances beyond your control, we will consider extending your exam date a day or two. See your lab TA if you think you are entitled to an extension because of a “backup failure.”
Do not write to the root of the C drive, that is, to C:\. Even it the computer lets you do so—and it probably won’t—you may inadvertently change or delete some files important to the computer’s functioning. Do not store a bunch of things on your desktop. The computer lets you only store a limited amount of work there. Instead, write to the C:\Temp folder.
You can get to the C:\Temp folder by clicking on Start, then My Computer, then double-clicking on the C: drive icon (it is under the Hard Disk Drives section of the window and is the one with (C:) as the last part of its label). You may get a message warning you that the contents of the drive are hidden (for your protection); if this message appears, click on the line at the bottom of the window that says you want to show the drive's contents. The contents of the root level of the C: drive will appear. You will see the Temp folder there.
When you are done using the computer, you must delete your work —and only your work—from the hard drive. This includes any files or folders you have created (all of which should be in Temp). You probably first want to back up your work; just copy the folders and files to whatever drive letter corresponds to your backup device (A:, E: or H:). Be sure to also empty the Recycle Bin, if it isn’t already empty. (The easiest way to do this is to select the Recycle Bin, right-click on the mouse, and select Empty Recycle Bin.) You can also rapidly delete files by clicking on them and then holding down the Shift key and then hitting the Delete key; when asked if you are sure you want to delete the files, click on Yes. This approach deletes the files immediately. Never, ever delete files other than your own; you could make the computer nonfunctional!
Do note: the machines in lab are remotely reinitialized as required; among other things, that means any work you leave on the C drive overnight may be irrevocably destroyed. So be sure to back up any of your work on the hard drive whenever you leave lab.
Further, if you leave your work on the hard drive, someone could copy it and turn it in as her or his work–a cheating situation in which you would be (inadvertently) involved. This has happened! So protect yourself; remember to delete your work from the hard drive.
And one last, important note: It is surprisingly easy to copy, by mistake, a shortcut for a file or folder to your backup device or the H: drive instead of the actual file or folder. If you do, you will not have saved your work! Remember, a shortcut just points to your work; it is not a copy of it. If you save the shortcut, you’ve saved the file’s (or folder’s) location on the hard drive of the particular computer you used. Even if you return to that computer, the information will probably be gone! Be careful to copy your work, not shortcuts to it.
One feature of the Internet is its electronic newsgroups. There are thousands of them. Each is a repository of related information of interest to a group of people. Since each has an Internet address, one can post messages to a news group by sending email to it (although there are easier ways). Reading a news group requires the use of a news reader, which lets you read news groups, write messages to them, make a copy of postings to your printer or disk, and follow threads, messages that are linked because they are responses to the same initial message.
Acessing newgroups is most easily done via the Internet. In particular, Google has made a major effort to store and allow access to virtually all Usenet newsgroup postings from 1981 to the present; Usenet is the major public newgroup respository. Google Groups allows you to search these newsgroups the same way you search the Web; see Group’s Getting Started Web page to, well, get started!
Of course, there are other ways to access news groups and you can access news groups using any tool you like. But whatever tool you use, be sure you know at minimum how to read newsgroups; it is a basic Internet skill.
Etiquette: There are several conventions and an etiquette to using the Net, especially when sending messages, be they to news groups or people—so much of what applies to newsgroups also applies to email messages.
The most famous news group etiquette document is Usenet Organization and Etiquette, part of a manual for an old news reader called NewsWatcher. Read the organization section to get a good feel for how news groups are organized and for their history and traditions. Then, read the etiquette section; following its suggestions will make your news group and email experience much more pleasant.
Doing work on one computer by connecting to it via another computer is called remote computing. In lab, there is a remote computing tool called SecureCRT; we use it to enable you connect to your UCInetID account from the lab, so you can use a tool called Pine to access your electronic mail.
You can also connect to the UCInetID machines from any of the NACS labs on campus, and from any off-campus computer with the appropriate communications hardware and software. Here, we tell you how to access the UCInetID machines from our lab; you’re own your own to learn what you need to do to access those machines from other locations.
Pairs should not share UCInetID access; each member should use her or his own account.
To use your UCInetID from the lab, open the Start menu and select All Progams then SecureCRT, then (on the submenu that appears) SecureCRT (again). A window will appear; in front of that window will appear the Connect window, which lists the computers accessible from the lab will come forward; select Ea.uci.edu and click on Connect.
Now a New Host Key warning may appear. If it does, click on Accept & Save. Now a dialog box will come up asking you for your user name; enter it. Do not check the Remember my username box! Then a dialog box asking for your password will come up; enter your password. Do not check the Remember my password box! (If you check these boxes, the next user at this machine could have access to your UCInetID account.) The dialog box will disappear, and the screen behind it will announce that you are connected to the UCInetID computer. You are now logged in to the UCI system.
When you’re done, type logout to leave the system, then select Exit from the File menu to leave SecureCRT.
(SecureCRT also has several other features; feel free to explore. You can find help with SecureCRT by clicking on SecureCRT ‘s Help menu.)
The easiest way to access your UCI email from lab is via a Web interface called WebMail. Just go to the Webmail page, log in with your UCInetID and password, and your mail appears; it allows you to read, write, delete and search for messages, among other functions. To learn how to use it, just click on the Help link near the top center of the main mail page, then the Table of Contents link in the window that appears. That page will take you to WebMail’s user documentation.
Eclipse is an integrated development environment (IDE), which combines the tools a programmer typically uses to create a large, complex programming project. It combines into one application a text editor (so you can enter your program), a compiler (to translate programs from Java to “byte code”), a virtual machine (that executes the byte code and thus runs the program), and a number of additional tools. Eclipse was not designed for educational purposes; it’s an industrial-strength tool that is much more complex and full-featured than we’ll need in this course. However, it has many benefits for an educational context:
When using a large, complex tool for the first time, the tricky part is not allowing yourself to become lost in all of the details and options that it presents to you. It turns out that you don’t have to know very much about Eclipse to use it effectively for this course; this lab assignment should equip you with most of the knowledge of Eclipse you’ll need for the duration of the quarter. If a new Eclipse skill is needed for a lab, we’ll explain it in the lab’s write-up.
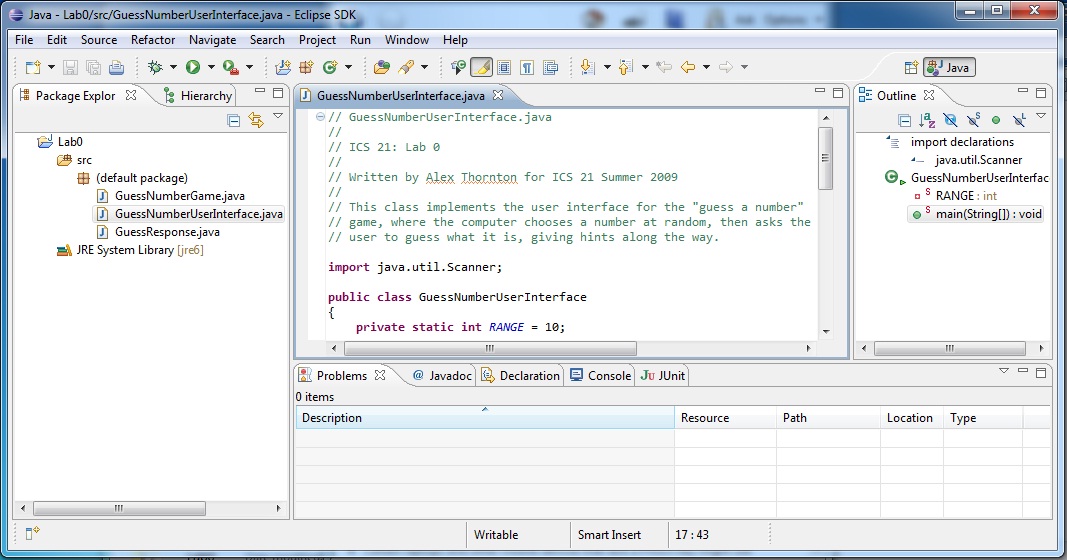
The following is a screenshot of Eclipse in action:
The window is separated into a few major areas:
One of the helpful features of Eclipse is how it helps you to organize your work, whether you are working on one project or many. It also gives you the ability to tweak a wide variety of settings, such as the version of Java to use to compile your programs, the fonts and colors displayed in the editor, the style of the code that Eclipse generates for you, and so on. A workspace is the repository for all of the files that make up your projects and all of your settings.
A workspace is stored on your hard drive within a single folder. When you start Eclipse, you select the workspace (the folder) that you’d like to use. I suggest using a single workspace for all of your work this quarter, as it will give you easy access to all of your previous work, as well as maintain your settings from one project to the next.
Eclipse provides a large set of options that allow you to configure it. When you’re using it for the first time, though, it’s hard to know which options to change and to what you should change them. Unfortunately, the default settings aren’t entirely appropriate for us in this course. Additionally, personal preferences tend to differ, which can sometimes make it difficult for a pair to work together productively.
To keep things straightforward, we’ll all use the same initial workspace. We’ve created an empty workspace, with the approriate settings—settings that will match the settings used by course staff when grading your lab exams. This workspace is available at
The workspace is provided in zip format; to use it, unzip it to a folder in a place you’ll be able to find again. A good place to put it when working in the ICS labs is on your H: drive, so that it will be available to you regardless of which machine you’re logged into, as well as permanently stored (remember, files stored to the C: drive can be erased). For example, you might put your workspace into a folder named H:\21Workspace. You might also want to store your workspace on a USB memory stick or other portable media, thus having a backup in case you lose the original.
(Note to Mac users who intend to use Eclipse on their own machines: the zip archive may appear empty, because it only contains a folder called .metadata. Files and folders whose names begin with a “.” are hidden in Mac OS X by default. Go ahead and unzip the archive as discussed above; all will be well.)
To run Eclipse in the ICS labs, click the shortcut titled Eclipse.
(Note that, in Windows, if you launch Eclipsec instead of Eclipse, Eclipse will start up but with a Windows console window also opened. Things still ought to work, but it’s best is to just exit and launch Eclipse.)
When you first start Eclipse, it will ask you what workspace you want to use. Rather than accepting the default, type in the complete path to the folder containing the workspace you downloaded and set up in the previous section (e.g., H:\21Workspace), or use the Browse... button to navigate to this workspace. This will cause Eclipse to start with the course-standard workspace loaded.
(It’s possible that you will not have been given a chance to specify what workspace you want; it will sometimes be the case that Eclipse has been previously configured on the lab machine by another student so that it won’t ask. If you're not asked, but Eclipse instead starts up, go to the File menu and select Switch Workspace... and then Other..., then choose your workspace.)
When you first start Eclipse in your new workspace, you’ll find that there is nothing listed in Package Explorer. In order to proceed with this assignment (and subsequent programming assignments), you’ll need to first create a new project within your workspace, which will contain all of the .java files (and sometimes other files) that make up your program.
To create a new project, go to the File menu, select New, then Java Project. You’ll now be presented with a dialog that asks you to name your project, and also make some other choices.
Once you’ve made these selections, click Finish.
You should see a folder called Lab0 listed in the Package Explorer. This folder represents your new project.
To give you practice in using workspaces and projects, here is a short program that plays the "guess a number" game, where the computer chooses a number at random, then asks the user to guess what it is, providing hints along the way. The program consists of the following three files:
To begin with, save these three files somewhere on your machine’s hard drive, but not within your Eclipse workspace.
The next step is to import the code into the Lab0 project in your workspace. This turns out to be relatively simple to do. Remember that, when you started Eclipse, you selected the folder that contains your workspace (e.g., H:\21Workspace). A workspace is entirely self-contained within that folder, including all of your settings and preferences, as well as all the projects you’ve placed in it. Navigate to the place where you stored your workspace (if you need help with navaigating to a folder, ask a TA or tutor for assistance) and open it.
Notice that, within your workspace folder, there is a folder called Lab0. This corresponds to the Lab0 project that you created earlier. (There is also a folder called .metadata, which contains all of your preferences and settings.) Within the Lab0 folder, you’ll find a folder called src. The src folder is intended to contain your .java files. (There is also a bin folder, which is intended to contain the compiled versions of your .java files, called .class files.)
Find the three .java files that you downloaded and drag them into the src folder inside of the Lab0 folder within your workspace. Then, in Eclipse, go to the Package Explorer, right-click on the Lab0 project, and select Refresh from the menu. The three .java files are now part of your project! (If you click on the "+" boxes next to Lab0, you can see that folder's contents. Click on "+" next to src and then next to default package, and you should see the three java files.)
A Java program is executed by specifying its “main class,” the class that contains a special method called main, the method where execution of a Java program starts. (We’ll talk about main in lecture.)
In the case of this program, the main class is GuessNumberUserInterface, which is stored in the file GuessNumberUserInterface.java. To execute the program, then, we can right-click GuessNumberUserInterface.java in Package Explorer, then select Run As..., then Java Application.
This program performs all of its input and output via Eclipse’ console window, but it’s not obvious where the console winsow is located. Look at the area of the Eclipse window where the Problems (error messages, warnings) are listed. In this same area, you’ll see a tab marked Console; click it. There's your console!
The Console tab gives you a valuable clue about whether a program is still running or has completed. For example, consider the following screenshot:
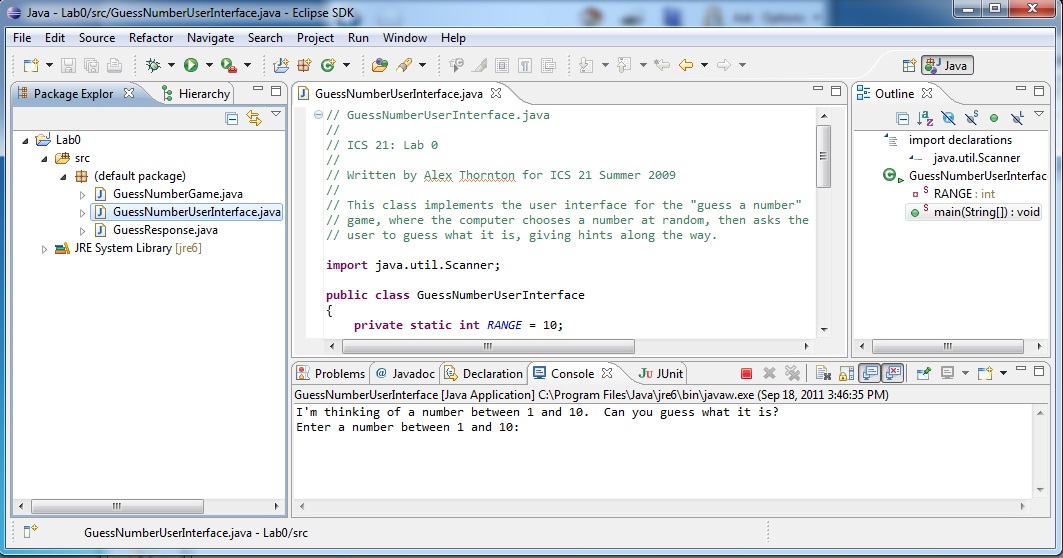
Notice the red, square-shaped button to the right of the JUnit tab; this button can be used to stop a running program. It can also tell you whether a program is still running, because it will only be active if the program is still in progress. When a program has stopped, you’ll find that the square-shaped stop button is no longer active, as in the screenshot below:
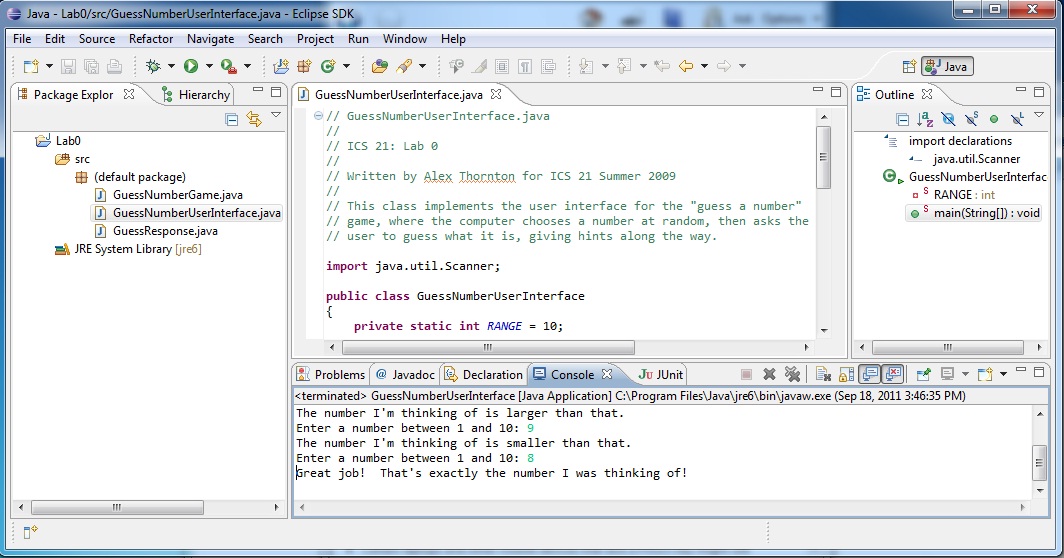
It’s generally a good idea to dismiss the console output window when you’re done with it by clicking the dark gray “X,” button next to the stop button within the console area. (Don’t click the X button next to the word Console, though; that’ll get rid of the Console tab from your user interface—and it takes some work to get it back.) If there is more than one console output window within that area, you can click the button with two X's to dismiss all of them. (If you don’t dismiss consoles when you’re done with them, you’ll find sometimes that multiple old versions of your program will still be running, which can be confusing.)
You can view your program's source code by double-clicking on the files listed in Package Explorer. Try double-clicking GuessNumberUserInterface.java to see the source code for this part of the program. (You can expand the window by placing the mouse on an edge, changing the cursor to arrows; then drag the mouse.) Don’t worry if you don’t understand how the program works; we haven’t learned anything about Java yet!
You can edit the code roughly as you would in a word processor, even though there are significant ways that editing code is different from editing prose; we’ll cover those differences in lecture as needed.