Run the GoogleTest
Unit Test
and Debugging |
Each data type that we will discuss this quarter also has a GoogleTest for
testing its implementation(s).
While a driver for a class is code that allows us to manually test its methods
and observe their results, a GoogleTest is code that automatically tests the
class and reports its results.
It produces output to show clearly which tests passed and which tests failed;
and for the failed tests, it produces more detailed information about how the
test failed.
When the code is modified (and hopefully corrected), it is very easy to rerun
all the tests automatically and observe the changes (hopefully more/all tests
are now passing).
Of course, some bugs are so severe that the test program crashes.
In such cases, we will know which test caused the crash (the last one shown to
run in the Run pane; we can set a breakpoint in the debugger to stop
at the first statement in that function, and then single-step to find which
line in the test caused the crash when executed.
To run the GoogleTest program...
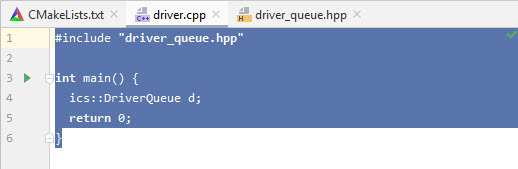
- Re-comment all lines in the driver.cpp file (because you do not
want to run the driver).
Recall that only one uncommented main function can exist in a C++
project, because there can be only one starting point for the program
being run; so you will comment this code and uncomment the code in the
test_queue.cpp file.
- Uncomment all the code in the test_queue.cpp file.
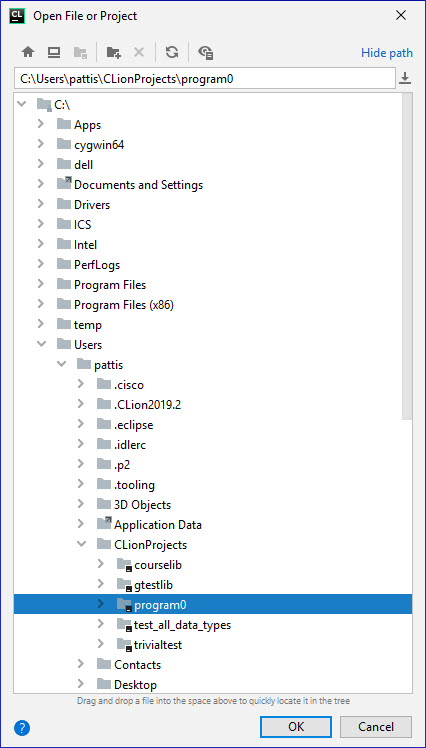
- Double-click the test_queue.cpp file that appears in the
Project pane.
- Click inside the test_queue.cpp Editor pane to activate editing.
- Type the ctrl-a command (command-a on Macs)
to select all the lines in this file.
- Type the ctrl-/ command (command-/ on Macs)
to toggle the commenting on the selected lines (uncomment them).
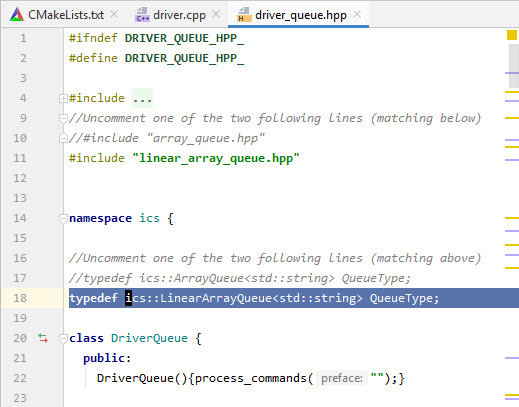
- Uncomment lines 7 and 14 in the test_queue.cpp file; those
lines specify testing the linear array queue implementation.
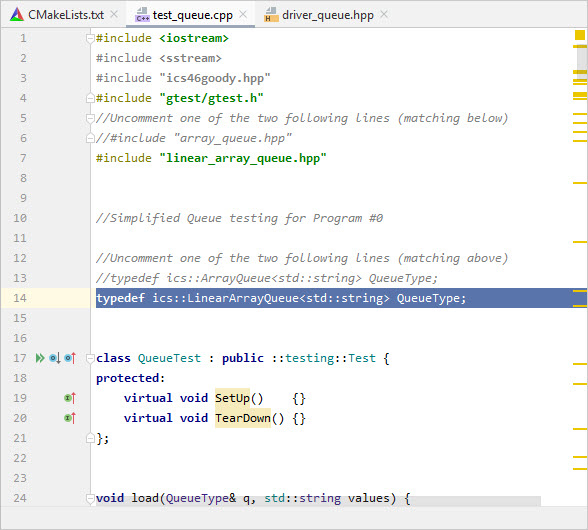
Before running this project, examine the code in the test_queue.cpp file.
It consists of 12 separate tests, each which should be readable and
understandable if you understand what queues are about.
The actual GoogleTest for implementations of the Queue data type is longer; but
you are using a smaller and simpler file for Programming Assignment #0.
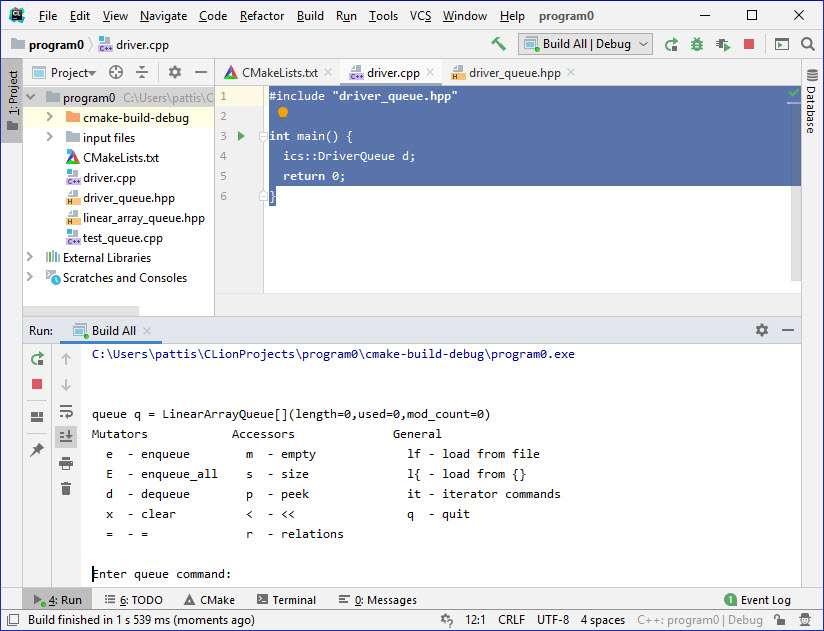
- Click the
 (Run icon) on this window to run the Googletest.
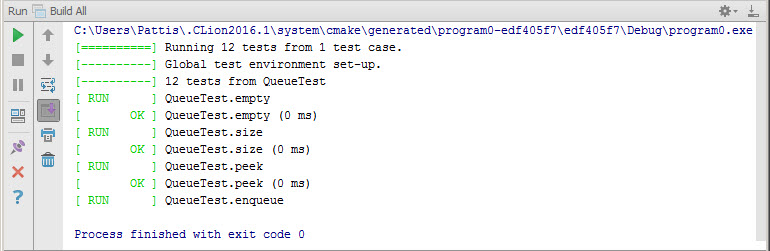
The Run pane should show the following.
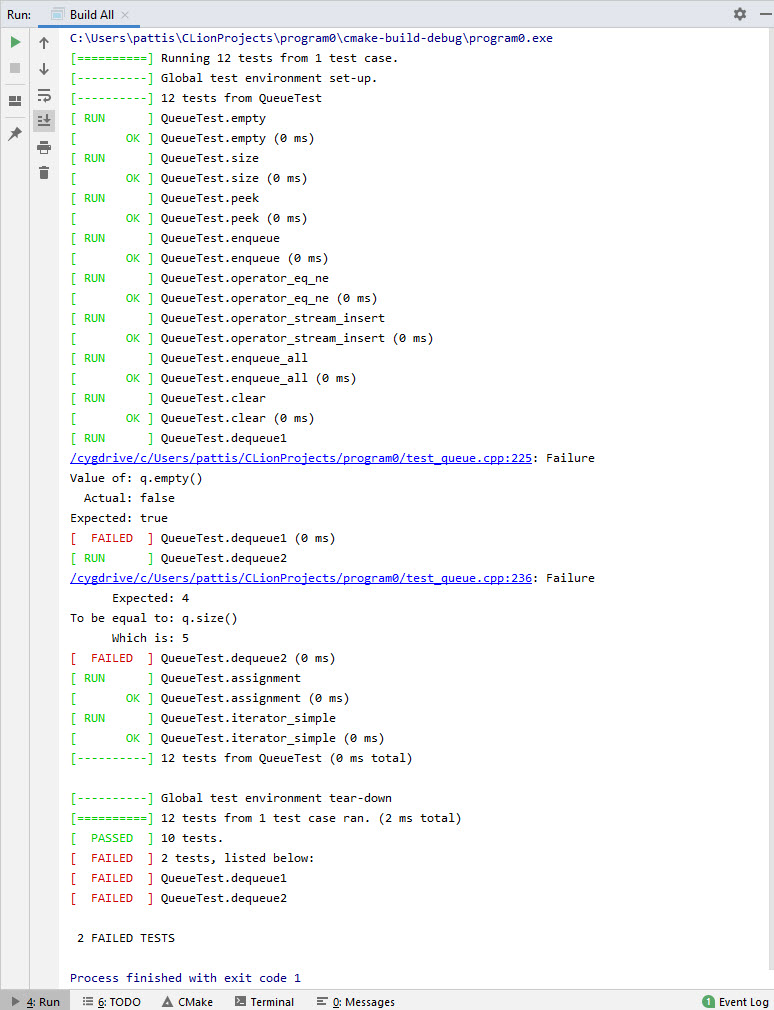
Check the bottom of GoogleTest's output first.
It summarizes the number of passed tests and names the failed tests: you can
examine these failed tests in more detail, if they are present.
Failure Modes
There are two major failure modes detectable in each GoogleTest.
- An assertion failure in a test means that the code being tested did not
meet its requirements.
GoogleTest will print useful information about the failure (just what it
prints is based on what kind of assertion failed).
In the figure above, both the dequeue1 and dequeue2 tests
failed (on lines 225 and 236 respectively); the assertions concerned
truth values for calling the q.empty() and q.size()
methods, whose different Actual and Expected values are
shown.
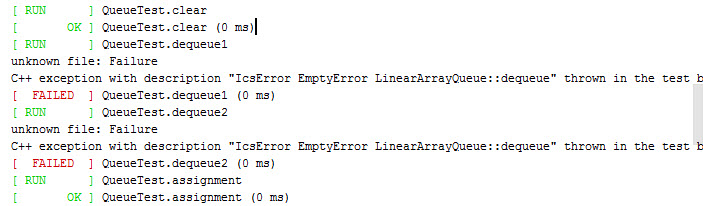
- An exception failure in a test means that the code being tested threw an
exception (not caught by code written in the test function).
GoogleTest will print information about the exception (although often
it just states an unexpected exception was thrown..
In the figure above, no unexpected exceptions were thrown.
If one was, it might look as follows:
In both cases, the GoogleTest records the failure and then continues with
subsequent tests.
In fact, after the first test in a function fails, no more code in that
function will be run; in such a case, GoogleTest just continues testing
at the next function.
In addition, there are two failure modes NOT nicely
detectable/reportable in a GoogleTest.
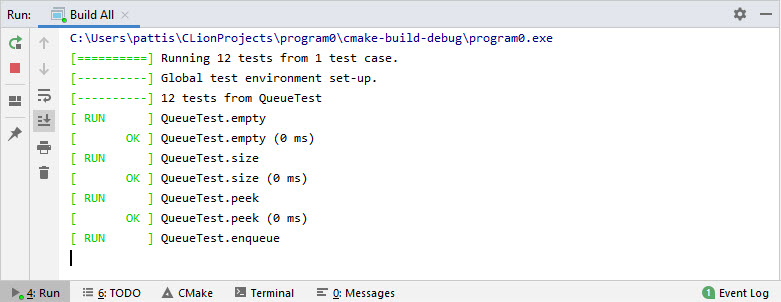
- An infinite loop: In such a case GoogleTest will stop printing
information in the Run pane after starting to run a test.
If the enqueue test caused an infinite loop, the Run pane
might look as follows.
In such a case, you would have to manually stop the program.
If you ever find your program in an infinite loop, you can terminate the
program manually by clicking the
 (Stop icon) on the left of the Run pane.
By these actions, the GoogleTest will stop and not be performed on subsequent
tests.
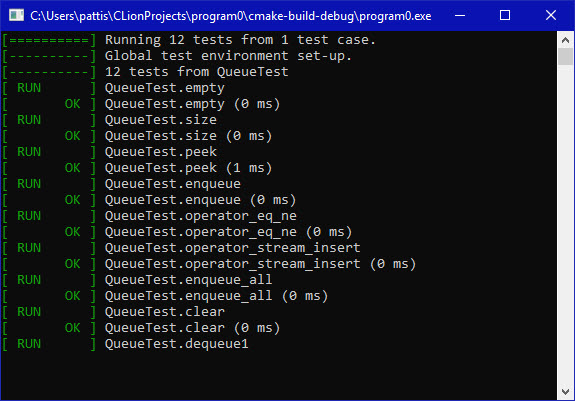
- Certain kinds of executions errors (e.g., accessing illegal memory).
In these cases, the program will stop executing the GoogleTest unexpectedly.
Note here that in the middle of RUNing the QueueTest.enqueue, the
program terminates.
When either of these kinds of errors occur, you have a choice of either
- commenting-out this test code running when the error occurred
(so GoogleTest won't run this test, but will run subsequent tests).
- keeping this test and immediately debugging the code that is causing it
to fail.
If you choose the first approach, remember to uncomment the test code
eventually to ensure that your code is passing all the GoogleTests eventually,
including this one.
Debugging Strategies
Here is a short but important list of four strategies that you can employ
when your code fails, to try to understand the cause of the problem (and then
hopefully correct it).
First, examine the line of code in the test at which the failure was detected
(which is printed in the Run pane) and the information it displays
related to the failure.
- Searching the code for a mistake using the failure information as a guide.
- Add arbitrary C++ code in the GoogleTest to print useful information
right before the failure line.
- Use the debugger to set a breakpoint on the line with the failed
assertion (the debugger stops before executing the breakpointed
line) and then examine any relevant state.
You can set breakpoints in the test_queue, driver_queue, an
linear_array_queue (or in any combination of these): whichever
will help you debug the error.
- Use the driver (or any tiny program you write) to duplicate/explore the
problem manually.
GoogleTests
Generally, each public method has its own GoogleTest, reflecting the
semantics (meaning) of what that method does in the class (but sometimes
needing to call other methods too).
It is good to be able to read and understand the GoogleTest code (and you will
get more experience doing so during the quarter) because it can be useful to
add debugging code to it: typically printing the state of variables just
before a test/assertion failed.
Mostly GoogleTest code intersperses calls to the methods of the class being
tested with assertions about what the results of those method-calls should
be: a test function fails when any assertions in it fail.
The tests are preformed in the order in which they appear.
I try to arrange my tests to go from the simple to the more complex.
Sometimes bugs that cause failures in the earlier tests also cause failures in
later test.
So an important debugging strategy is to concentrate on -and correct- the
earlier bugs: at best the later bugs might automatically disappear; at worst
it will be easier to understand/correct the later/more complicated bugs after
you have understood/corrected the earlier/simpler ones.
Also note that each test is abandoned when the first assertion fails; it
doesn't test subsequent assertions in that test function
(but GoogleTest will still attempt to do all subsequent test functions
after any detectable failure).
This strategy leads to two interesting consequences
- The output is not cluttered with multiple failure messages for
multiple assertions in each test: instead each test either passes or
fails; and if it fails, it presents details about only the first
failure.
- Expect that a test might still fail after you make corrections to your
code.
But, the correction should cause a failure later in that test:
e.g., an earlier assertion in the test that failed should now pass,
even if a later assertion (which was not reached because of the earlier
failure) now is tested and fails.
Plan on eliminating bugs/failures one at a time, until none are present.
Don't worry about rushing through the process; try to make small but incremental
progress while you debug.
Debugging Strategy Examples
Here we will examine the four strategies for debugging stated above.
The first failure was on line 225 in the dequeue1 test.
The entire test appears as follows, with its line numbers.
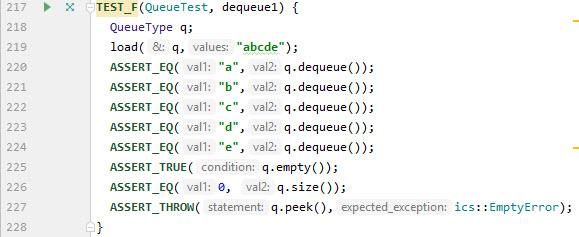
Note that the arguments in these function calls are prefaced with the names of
their matching parameters in gray -a CLion feature we discussed earlier in
this handout.
The code on line 225 states that the queue was expected to be empty but it was
not.
- Our first strategy would be just to look at the code in the
LinearArrayQueue class.
We will see that the empty method returns false when
used is not 0.
We will also see that used is initialized to 0, and if we
enqueue five values (what load(q,"abcde"); does)
and then dequeue five values it should return to 0.
Since the enqueue test worked, we can focus on the dequeue
method to learn why used was not decremented to 0.
- Our second strategy would be to add some code in the dequeue1 test to
help us understand why the empty method returns false.
We could, for example, print the size and even the queue itself (using the
more verbose .str() function), using the following code.
std::cout << "in deqeue1: size = " << q.size() << ", queue = " << q.str() << std::endl;
I highly recommend putting textual material in these debugging displays, to
identify them: as we put more and more debugging displays into a program
(which we typically do when debugging) they can become confusing.
If we put this code right before the line 225 it would display
in deqeue1: size = 5, queue = queue[e,e,e,e,e]:rear(length=8,used=5,mod_count=10)
The queue is supposed to be empty, but its used is 5.
It might be useful to put this statement after the call to
load and after each call to dequeue() to observe how
used changes (in fact, it doesn't).
Doing so would produce the following output.
in deqeue1: size = 5, queue = queue[a,b,c,d,e]:rear(length=8,used=5,mod_count=5)
in deqeue1: size = 5, queue = queue[b,c,d,e,e]:rear(length=8,used=5,mod_count=6)
in deqeue1: size = 5, queue = queue[c,d,e,e,e]:rear(length=8,used=5,mod_count=7)
in deqeue1: size = 5, queue = queue[d,e,e,e,e]:rear(length=8,used=5,mod_count=8)
in deqeue1: size = 5, queue = queue[e,e,e,e,e]:rear(length=8,used=5,mod_count=9)
in deqeue1: size = 5, queue = queue[e,e,e,e,e]:rear(length=8,used=5,mod_count=10)
- Our third strategy is to use the debugger to set a breakpoint before the
failed assertion, and then examine relevant state.
The debugger in CLion/C++ (GDB) operates similarly to the Eclipse/Python.
We can set unconditional and conditional breakpoints, single step (into,
over, and out of) code, observe the values of global and local variables.
Experiment with the debugger until you know how to use it to perform common
debugging tasks (like those indicated below).
Try these steps.
- Double-click the linear_array_queue.hpp file in the Project
pane to edit it.
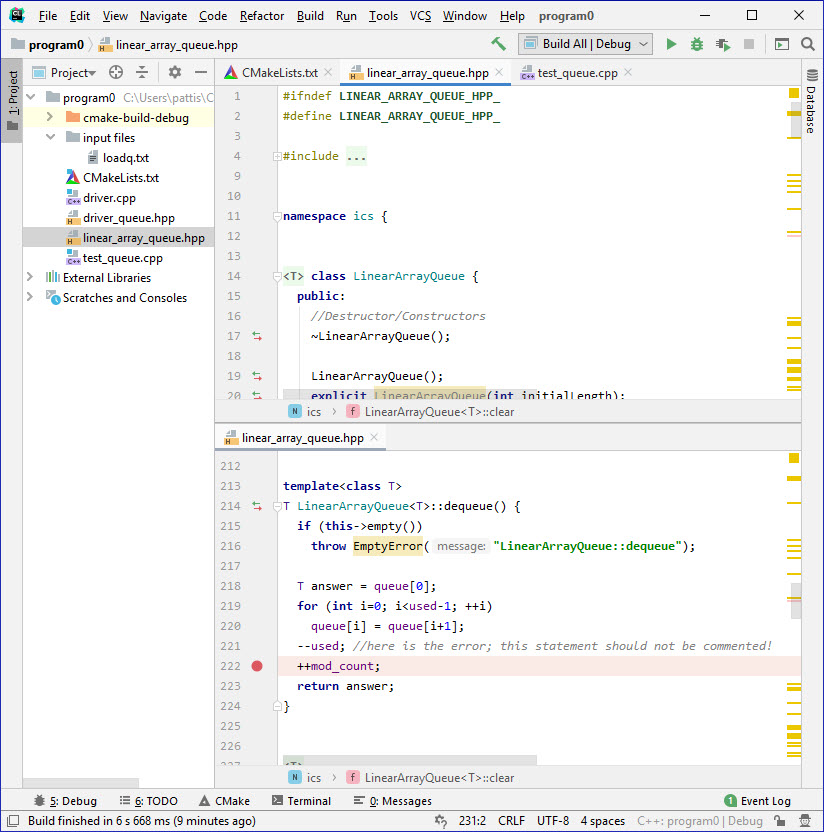
- Set an unconditional breakpoint on line 222 (the
++mod_count; statement in the dequeue method);
recall that when a line has a breakpoint, execution stops
before the line is executed.
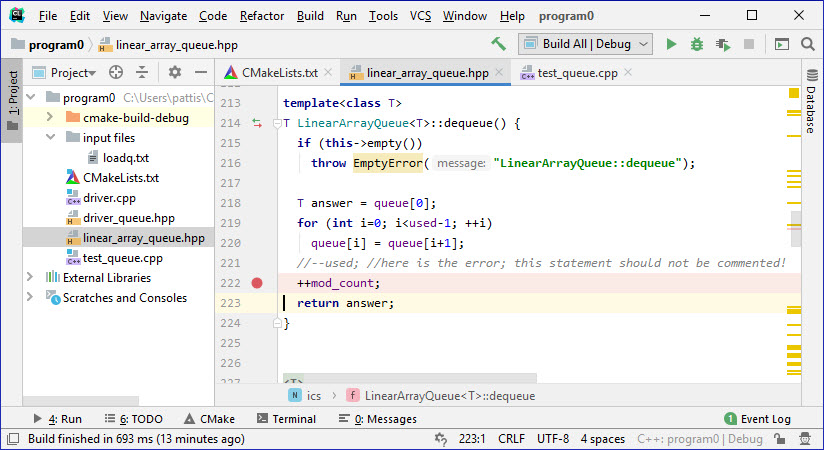
- Launch the debugger by clicking the bug icon
 . .
This rebuilds and starts running the test_queue program,
which stops the first time it reaches line 222.
When debugging, the Run pane appears in a pop-window.
And the CLion window shows debugging information (mostly in the
Debug pane).
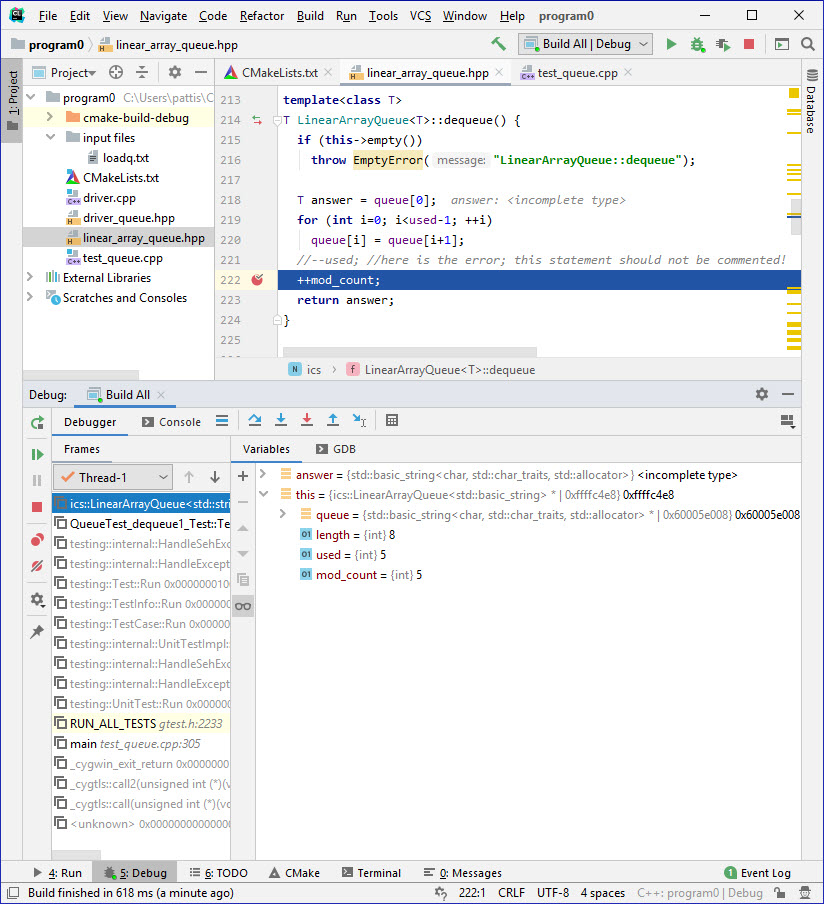
Here I have disclosed the object pointed to by this in the
Variables part of the Debug pane).
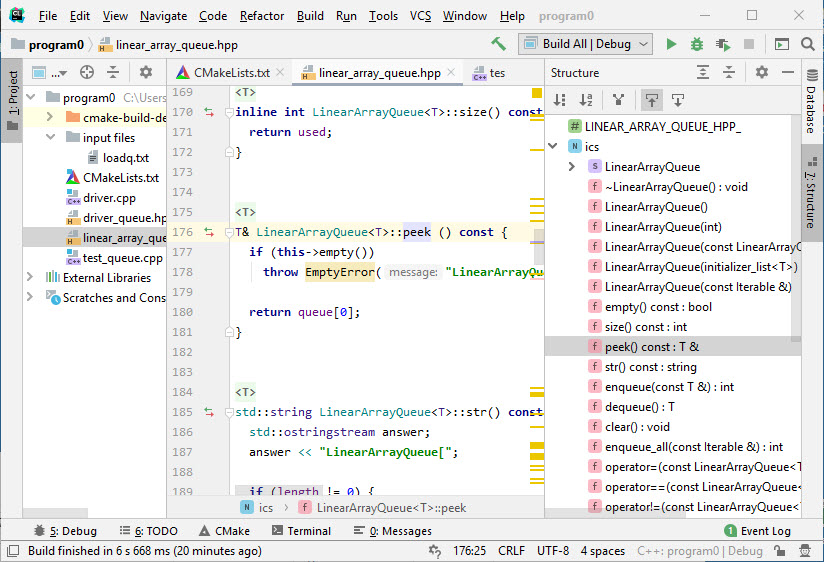
If I clicked on QueueTest_dequeue1_Test in the
Threads-1, the editor pane switches to
test_queue.cpp and the Variables pane switches
to showing its local variables, which I have disclosed in
the picture below.

In this way, we can see the code/variables for any function in the
call stack by just clicking it.
- Execute the current line (222) by clicking the
 ,(Step over icon).
The result is ,(Step over icon).
The result is
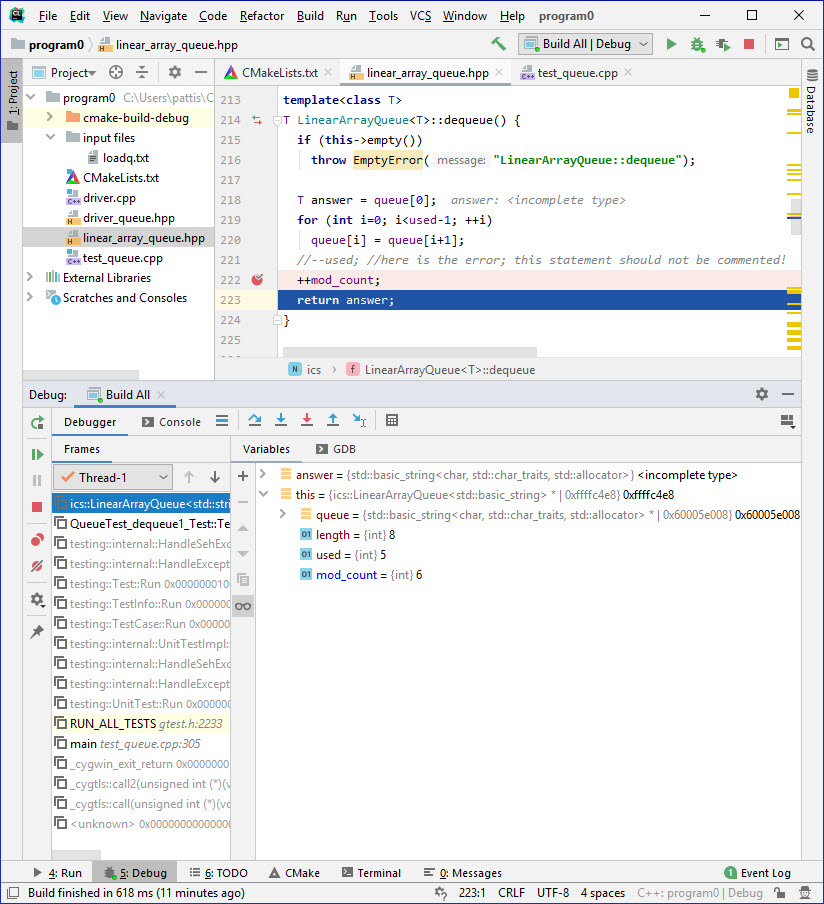 . .
- The code on Line 223 in the
linear_array_queue.hpp pane is highlighted in blue,
indicating this line is about to be executed.
- Underneath Thread-1 shows the top of the stack as
executing the dequeue function in the
linear_array_queue.hpp file (at line 223).
- The Variables pane shows the mod_count member
as changed (it appears in blue, highlighting which variables
changed) to the value 6.
I'm hoping that you have had some experience with debuggers in your
prior programming classes and that you will take some time to explores
this one's features.
- Our fourth strategy would be to use the driver to duplicate/explore the
problem manually.
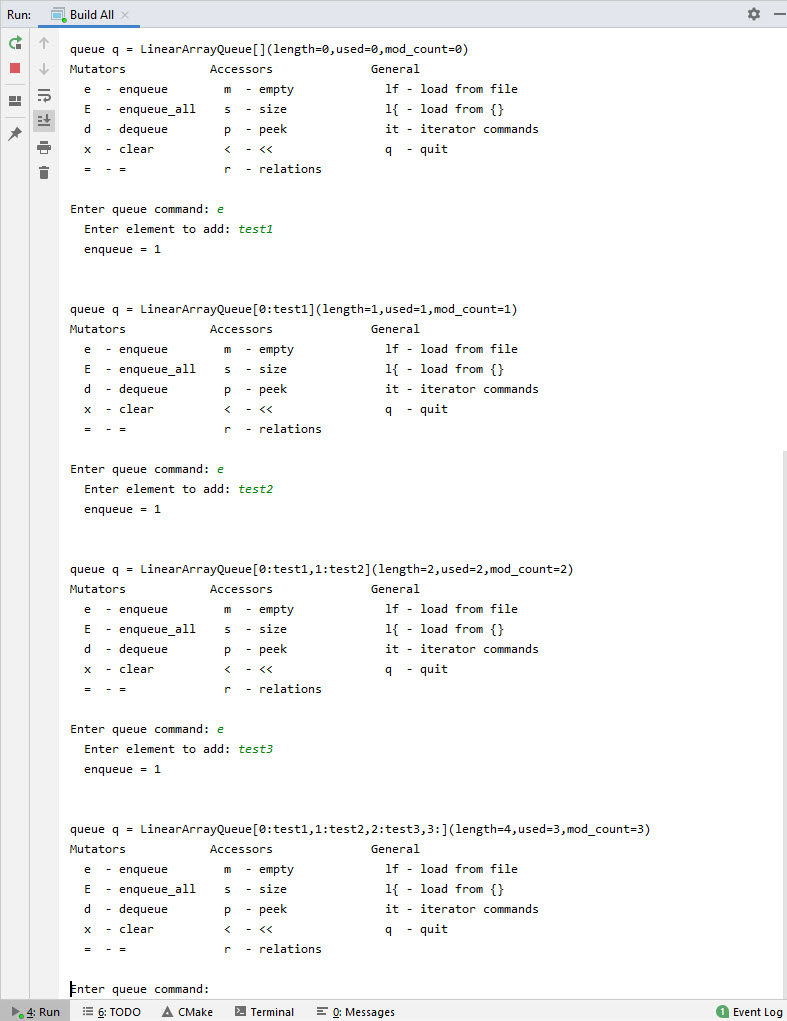
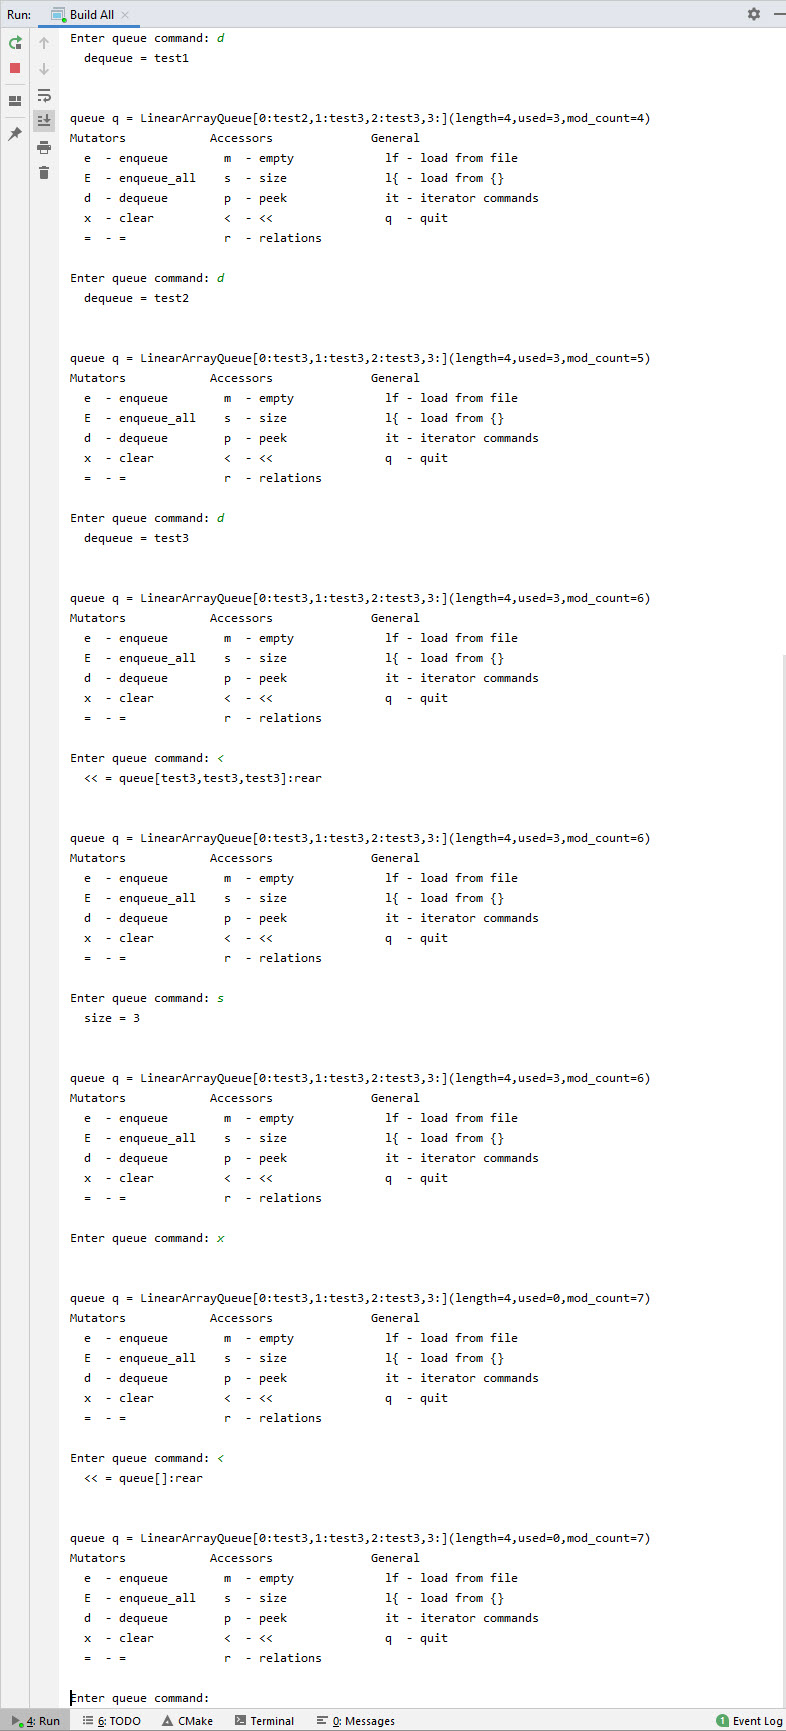
Actually, in our discussion of the driver we saw that when we enqueued
three values and dequeued all three, the result was a queue whose
used was still 3, with the last enqueued values stored in
all indexes.
Recall that to re-run the driver, we would have to uncomment its code,
after commenting-out all the code in the GoogleTest, and then re-run
the project code.
In fact, both test failures relate to a single bug: the used variable
was not decremented in the dequeue method: I commented-out the code
at line 221 of the linear_array_queue.hpp file.
Remember that sometimes fixing one bug will cause many failed tests to pass.
Restore this line of code (uncomment it) to fix the error.
Now rerun this GoogleTest and verify that there are no more failures.
The bottom of the Run pane should show
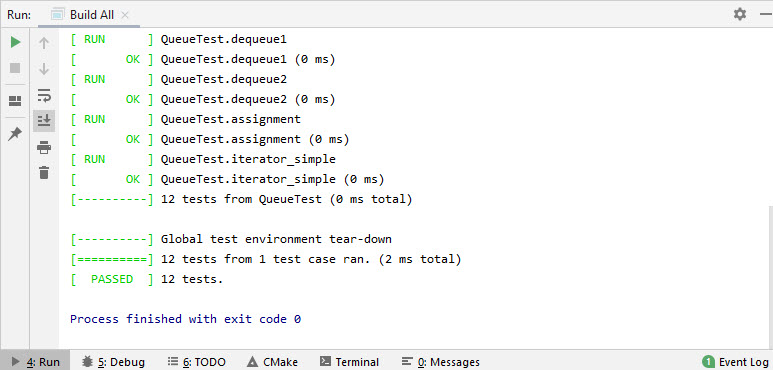 . .
Originally, both errors and failures indicated that the code is incorrect and
should be fixed.
Of course, we must be careful because it is possible that an assertion is
incorrect: e.g., an assertion asserts the size of the queue is some number
but based on the enqueue/dequeue methods called in the
GoogleTest it should be some other number.
While you should mostly believe the GoogleTests I distribute, there is always
the possibility that I have made a mistake.
If you look closely at a GoogleTest and don't understand why some failing
assertion should be true, please contact me or one of the staff to help
resolve the problem (or post on Piazza).
|


 (Close icon) on the left of the Run pane to close/remove the Run
pane.
(Close icon) on the left of the Run pane to close/remove the Run
pane.
 .
.
 .
.